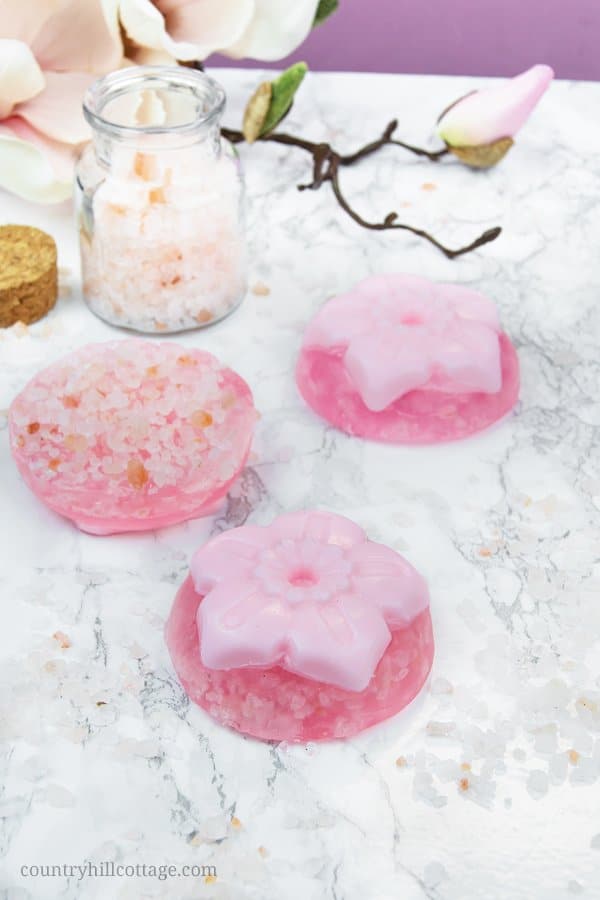
Refresh and vitalize your skin with a gorgeous DIY exfoliating soap with Himalayan salt! Suitable for your hands and body, the salt crystals provide gentle exfoliation and cleansing, while the added vitamin E oil nourishes and moisturizes the skin. These handcrafted soap bars are made with a melt-and-pour soap base so you can have them ready in no time.
In honor of spring, I scented the soap with a beautiful magnolia fragrance and added a pretty floral soap embed, making the exfoliating bars great gifts for Mother’s Day, spring birthdays or beauty lovers all year round. You can, of course, use any other fragrance or essential oils of your choice. Read on to learn how to create this homemade exfoliating soap and how to make the cute flower embed!

Disclosure: This post contains affiliate links, meaning, at no additional cost to you, we will earn a small commission if you click through and make a purchase. Learn more
Materials for DIY exfoliating soap
I recently shared sugar soap scrub bars made with sugar, soap and coconut oil that are gently exfoliating (definitely give them a try ). This DIY melt and pour exfoliating bars have stronger peeling effect. Here’s what you need to make these exfoliating soap bars at home:

Melt and pour soap base
The floral embed is made with a white, opaque melt and pour soap base. I used a goat’s milk soap base as this what I already had at hand. This soap base has a creamy lather and milky white hue, which is perfect for adding any color or fragrance.
You can also use shea butter, Castile, or cocoa soap base instead. Just take into account when choosing a fragrance that cocoa soap base has a distinct chocolate smell. Each soap base behaves a little differently, so it’s a good idea to check the manufacturer’s recommendations.
The base of this soap is created with clear melt and pour soap. I used a clear soap base to create a contrast to the flower and make the salt crystals visible. When pouring the soap, work in layers, so you have salt throughout the soap and not just one layer at the bottom.
Alternatively, chose a clear suspension soap base, which is formulated for suspending additives evenly throughout your soap.

Himalayan salt & vitamin E oil
I admit that I picked Himalayan salt mostly because I thought that its distinctive pink hue would compliment the pink shades of the soap beautifully. Aside from aesthetic considerations, Himalayan salt is said to have many benefits.
Himalayan salt is unrefined and shares a higher content of trace minerals than refined table salt. Its coarse crystals are an excellent exfoliant and will give a good peel and cleanse the skin. You can also swap it for dead sea salt or Epsom salt, whatever you have available or prefer.
For added skin care, I enriched the soap with vitamin E oil. Vitamin E oil is a versatile and useful ingredient for homemade skin care products and aids anti-ageing treatments. It acts as a natural antioxidant neutralizing free radicals while helping to moisturize and soften the skin.

Fragrance & colour
It’s currently spring in London, which means the city’s roads are lined with blossom-studded magnolia trees. I tried to capture the beauty of the magnolia flowers in this soap and therefore chose a lovely magnolia fragrance oil to scent my exfoliating soap bars.
Magnolia absolute essential oils exist, but these are usually outrageously expensive or smell disappointing. You can add essential oils at a 2% concentration. At the moment, I’m loving this Soothe and Honeybell essential oil blends from Plant Therapy (not sponsored, PT just has lovely products.) Another fun idea is to fragrance the flower embed and the exfoliating part with two different scents.
I tinted my DYI exfoliating soap pink with a shade from this set of liquid soap colours. This colorant is very potent so use only tiny amounts. The colors are suitable for many homemade bath projects so you can repurpose them for other beauty DIYs. If preferred, use micas or color blocks instead.

Flower mould
I chose a mould with a simple 5-petal flower, which I pretend to be a magnolia. The petals are relatively large, which makes it easy to cut away the excess soap when creating the flower embed.
I found this set of 3 silicone moulds with 3 different flower designs on Amazon. Working with all 3 moulds enabled me to pour the soaps in one go instead after one after another.
I will use the other flower designs in future projects. Shapes with small, intricate petals won’t work as well for this technique. But don’t fret if you have a dahlia or rose mould and use it instead.
Gift the DIY magnolia soap
The pretty and feminine design makes this soap the perfect little homemade spring gift, DIY Mother’s Day gift, birthday present and Easter basket stuffer. It’s an excellent present for hostesses, housewarming, and of course to treat yourself! I put the magnolia soap bars into cellophane gift bags, added one of our printable gift tags and tied the whole thing with a piece of twine. Super adorbs, don’t you think?
If you look closely, you can see specks of Himalayan salt shining through the clear soap base. The salt not only turns this DIY soap bar into a homemade exfoliating soap but also adds visual appeal.

I used a pairing knife to remove the excess soap between the flower petals. This step is optional but will give the embeds a more refined look.

DIY Exfoliating Soap Recipe
Refresh and vitalize your skin with a gorgeous DIY exfoliating soap with Himalayan salt! Suitable for your hands and body, the salt crystals provide gentle exfoliation and cleansing, while the added vitamin E oil nourishes and moisturizes the skin. These handcrafted soap bars are made with a melt-and-pour soap base so you can have them ready in no time.
Materials
- 240 g (8.4 oz) goat’s milk melt and pour soap base (or shea butter melt and pour soap base)
- 300 g (10.6 oz) clear melt and pour soap base
- 100 g (3.5 oz) Himalayan salt
- pink soap colorant
- fragrance or essential oil (I used this magnolia fragrance oil, see more suggestions above)
- 1 tsp vitamin E oil
- rubbing alcohol
Tools
- flower mold
- digital scale
- soap cutter
- cutting board
- melting jug
- glass stirrer
- spritz bottle
- small pairing knife
Instructions
- Melt the white soap base. Using a soap cutter, cut the goat’s milk or shea butter soap base into 2.5 cm (1 in) cubes and place them into a microwave-safe jug. Melt the soap cubes in the microwave set on low in 60-second bursts and stir gently in-between until the soap is liquid.
- Add the liquid ingredients. Add a small drop of pink soap colorant, the vitamin E oil and up to 5 g (0.17 oz) fragrance or essential oil to the base and stir until the color looks uniform.
Tip: One small drop creates a pretty pastel hue. Simply add a little more if you prefer a stronger color. - Pour the flower embeds. Place the silicone mold(s) on a tray or cutting board. Slowly pour the soap into the flower part of the mold. Then spray the top of each cavity with rubbing alcohol to dissolve the bubbles. Place the molds in the fridge for 30 minutes or until the soap feels hard to the touch.
- Refine the floral embeds. Release the flowers from the mold and using a painting knife cut away any excess soap between the petals (see photo above). Return each flower embed back into the cavity. This step is optional. If you’re short on time skip it and continue with the fifth step.
- Melt, tint and scent the clear soap base. Repeat steps 1 and 2 with the clear soap base. Scent the soap with up to 7 g (0.25 oz) of fragrance or essential oil. For a light hue, only add the tiniest amount of pink as the soap colorant will be much stronger in a clear soap base than an opaque one.
- Layer the clear soap base and Himalayan salt. Pour a small amount of clear soap base into each mold, just enough to cover the flower embed. Then sprinkle on a layer of Himalayan salt. Follow with another soap pour and so on until the mold is filled. Finish with a layer of Himalayan salt. Tip: I only filled each cavity 2/3 with soap as I wanted slightly smaller soap bars. For bigger bars fill each mold to the rim.
- Let the soap set. Allow the soap to harden for several hours at room temperature or in the fridge for about an hour.
- Release the DIY exfoliating soap. Once the soap is fully hardened, gently flex the mold to release the soap bars.
Notes
The amounts stated in the soap recipe are enough to make six 100 g (3.5 oz) soap bars. The silicone molds are very soft and flexible. I recommend putting the molds on a tray or cutting board so you can lift and move them into the fridge for chilling without spilling liquid soap.


Gail
Wednesday 29th of April 2020
Hi Denise Beautiful soaps I’m excited to try these.
Can I please ask
When layering the clear base and salt how long do you leave each layer before adding more so the salt is right through the bar Thank you
Irena | Country Hill Cottage
Wednesday 29th of April 2020
Hi Gail! I'm so glad you like the soap! I waited for 2 to 3 minutes before I poured the next layer. You can tell that it's time to add the next layer once the previous layer feels solid. Please let me know in case you have another question and happy crafting! xx
Denise V Cox
Friday 15th of March 2019
I love these flowers!! So very lovely and Magnolia is one of my favorite trees ( and scent). I am confused though, even after reading the post several times. After the initial flower sets, you place it back in the mold to melt... again?? It doesn't sound right, but I haven't made soap before. If you could please clarify... I would love to make this as Easter/ Spring gifts. Looking forward to hearing from you... Denise
Country Hill Cottage
Saturday 16th of March 2019
Hi Denise,
Yes, it's a wonderful flower! Sorry for the confusion. When I poured the flowers they had a little bit of excess soap between the petals. So I took the flowers out of the mold, trimmed that excess stuff away and put it back into the mould. You can skip this step if you don't mind a little bit of soap between the petals. The flowers won't be melted. Instead you melt the clear soap base and pour it over the flower. This how you embed the flower in the clear base. I hope this helps and please let me know if you have another question.
Irena xx
A Life Adjacent
Sunday 10th of March 2019
These are so pretty! We were just talking about how lovely these photos are too! Just stunning!
Country Hill Cottage
Monday 11th of March 2019
Thank you so much, ladies! We appreciate your kind words.
Rebecca Dillon
Sunday 10th of March 2019
These are super cute!
Country Hill Cottage
Sunday 10th of March 2019
Thank you so much, Rebecca!