DIY speckled egg bath bombs make cute homemade Easter gifts for family, friends, neighbors, and teachers. The bath bomb recipe is easy to prepare, made with natural ingredients and can be customized with different fragrance or essential oils.
Added to a warm bath, these Easter egg-shaped bath bombs create a fantastic fizz and the scent released into the air is wonderfully relaxing. Perfect for a fun and bubbly bath time! Read on and learn how you can make my DIY fizzy bath bombs!

Disclosure: This post contains affiliate links, meaning, at no additional cost to you, we will earn a small commission if you click through and make a purchase. Learn more
Tips for making DIY bath bombs
Making homemade bath bombs is easy, but there are a few things that you need to know before creating them. I wrote down a few tips that will help you to make bath bombs at home.

Mixing the bath bomb mixture
The first step is to combine the dry ingredients. Use a wire whisk and stir until no lumps are visible and the mica color is evenly distributed. Next, melt the coconut oil. Wait until it’s warm to the touch and stir in fragrance or essential oils. Knead the dry and wet ingredients together.
Now spray the mixture with witch hazel or rubbing alcohol. Bath bombs consist of baking powder, SLSA, citric acid – ingredients that react when they come in contact with liquids. So spritz small amounts of rubbing alcohol or witch hazel to the dry ingredients and whisk the entire time.

Consistency of the bath bomb mixture
You know that the mix is ready when it feels like barely damp sand. Importantly, the bath bomb mixture should not be wet, e.g. have the consistency of cookie dough (= too much liquid). If that happens, set aside for a while so the moisture can evaporate. Ideally, make the bath bombs in a dry place. High humidity in the air can make it more difficult to form the bombs.
Do this test: take a little of the mixture and squeeze it tightly in the palm of your hand. If the lump is compact and holds together then you’re good to go. As the alcohol evaporates quickly, you might have to add a little more after a while to get the right consistency again.
Filling the mold
You might think that you have to pack and press the mixture tightly into each part of the mold before assembling to get a nice shape. But that is not the best method as the mixture might stick to the mold, and the bath bomb can break in half.
Instead, loosely overfill both parts of the egg mold with a generous amount of mixture. There should be a high heap of mixture in each piece. Then press both halves firmly together and brush off any excess.
Another tip is to clean the mold after each use or use a new mold for every bath bomb. Even small mixture residue in the mold can make it more difficult to get the bath bomb out.
Releasing the bath bombs from the mould
Some bath bomb recipes suggest to let bath bombs dry in the mold for 12 to 24 hours before releasing the bath bombs from the mold. But that isn’t necessary with my recipe. You can unmold them immediately after filling and pressing the mold together.
To do this, take off one half of the mold and then the other. In case the mold doesn’t come off right away, gently tap with the back of a teaspoon and it should come right off. Let the bombs dry overnight before applying the specks.

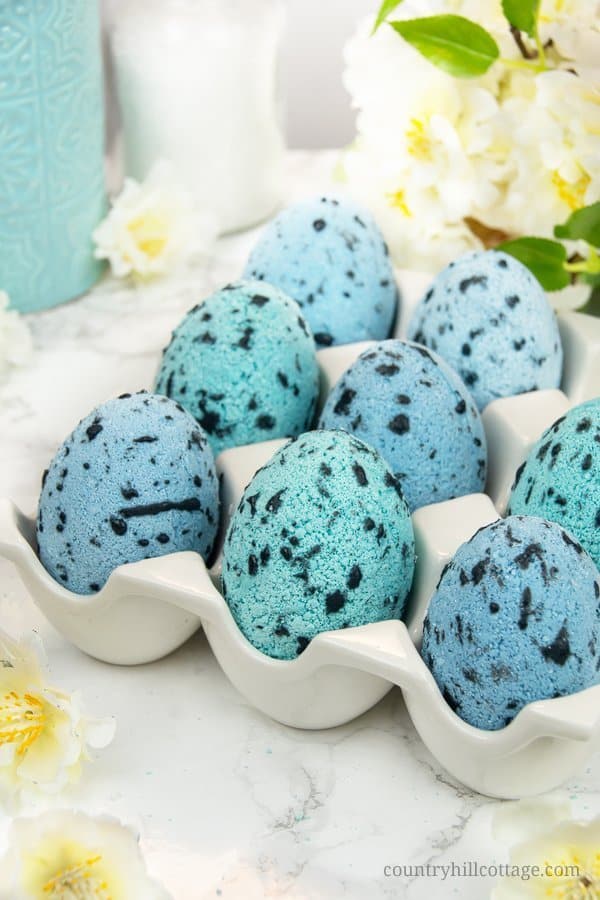
Create the speckled egg pattern
To make the dotted egg pattern I mixed, a little rubbing alcohol with black mica powder. At first, I tried to splatter on the colour with a brush and even a toothpick, but the liquid doesn’t splatter well. I then painted the dots on one by one with a small, round brush.
The brush should be soft, so you don’t pick up any material from the bath bomb. At first, it seems tedious to paint each egg. But once you get into a groove, it’s a rather quick process. It took me about 2 minutes to finish an egg. To be honest, I only painted the top and sides but didn’t bother with the back/bottom.
I also recommend using the least pretty egg as a designated test object so you can experiment a little how to apply the speckles. Speckled eggs are covered in an irregular pattern of smaller and larger dots and flecks. Some are more prominent, others appear to be translucent. It helps to have a photo for reference close by.
Try not to touch before they have dried, so you don’t accidentally smear the pattern. And even after drying, touch the bath bombs only lightly.

Gift the speckled egg bath bombs
Easter egg-shaped bath bombs are a fun and adorable homemade gift idea for spring and Easter. They are a lovely non-food Easter basket stuffer. You can put a few egg bath bombs into an empty egg carton. Decorate the egg carton with stickers, ribbon, washi tape, you name it, and you have an adorable little present.
Or wrap them individually in cellophane bags and gift them with a beautiful ribbon and a printable label. Also, add a note that these aren’t edible as someone might mistake them for a treat.

DIY Speckled Egg Bath Bombs
DIY speckled egg bath bombs make cute homemade Easter gifts for family, friends, neighbors, and teachers. The bath bomb recipe is easy to prepare, made with natural ingredients and can be customized with different fragrance or essential oils.
Materials
- 150 g (1 1/2 cups) baking soda
- 100 g (1/2 cup) citric acid
- 50 g (1/2 cup) cornflour (cornstarch)
- 50 g (1/2 cup) SLSA (Sodium Laurel Sulfoacetate)
- 50 g – 60 g (1/4 – 1/3 cup) coconut oil
- spray bottle of rubbing alcohol or witch hazel
- 20 – 30 drops essential oil or fragrance oil of your choice
- blue / green / turquoise and black mica powder
Tools
- mixing bowls
- whisk
- rubber gloves
- face mask
- egg molds
- baking (parchment) paper-lined baking sheet (tray)
- small, round paintbrush
Instructions
- Mix the dry ingredients. Add the baking soda, citric acid, SLSA, cornflour (cornstarch), and blue, green, or turquoise mica powder into a large mixing bowl and whisk until well combined.
- Melt and scent the coconut oil. Put the coconut oil in a microwave safe bowl or jug and melt on low in 30-second bursts until liquid. Let cool to the touch, for about 3 to 5 minutes. Then stir in the essential or fragrance oil(s).
- Mix the dry and wet ingredients. Add the coconut oil to the dry ingredients and stir well. Spray rubbing alcohol or witch hazel, a little at a time, and incorporate into dry mixture with your hands. Don’t add too much liquid at once as the citric acid and baking soda will start to fizz and bubble. Break down any lumps. The bath bomb mixture should have the look and consistency of wet sand and keep its shape and stay together when you pressed it in your hands.
- Mold the Easter egg bath bombs. Loosely fill both halves of an egg mold with the mixture, creating a heap higher than the mold. Then press both parts of the mold firmly together, which will compress the mixture into an egg shape. Swipe away any excess.
- Release the bath bombs. Carefully lift one part of the mold. Turn over the mold in your hand and take off the other part to release the bath bomb. If the mold seems stuck, gently tap the outside of the mold with the back of a spoon. Put the bath bombs onto a lined baking tray (sheet) and allow to dry overnight.
Tip: Handle the bath bombs gently as they are fragile at this point. The bombs will solidify while drying. - Apply the speckles. In a small mixing bowl, combine 1 teaspoon rubbing alcohol with 1/2 teaspoon black mica powder. Stir until well blended. Using a soft, round paintbrush dry on small dots and specks all over the egg bath bombs. Let dry overnight. Handle the bombs carefully as not to smear the specks and dots.
Notes
SLSA is a very fine, dusty powder. Wear a face mask to avoid breathing any in. I also recommend to put on disposable rubber gloves to protect your hands from discoloration.
How to use these DIY speckled Easter egg bath bombs
Add one or two of the egg-shaped bath bombs in the bottom of your shower or in your warm bathtub to create fizz and bubbles and to release the fragrance.
Shelf life and storage
Store the bath bombs in an airtight container, away from heat and moisture as moisture can cause the bombs to lose their fizziness. The bombs can be kept for up to 9 months.


Kristi Dominguez
Monday 8th of April 2019
These are fantastic! What a fun Easter basket treat for friends and family! Thank you bunches for linking up and sharing with us!
Country Hill Cottage
Tuesday 9th of April 2019
Thanks a lot, Kristi!
andrea
Saturday 23rd of March 2019
I am totally in love with these adorable little speckled egg Bath Bomb! I just want to make them by the dozens!!!! Thank you for always sharing such gorgeous creations! Sending hugs and wishes for a brilliant weekend!!! Cheers!
Country Hill Cottage
Saturday 23rd of March 2019
Thank you so much for your sweet comment, Andrea! I we could send you some of these bath bombs. Have a fabulous week, too!
Kyla | A Life Adjacent
Wednesday 20th of March 2019
What a cute and creative Easter DIY! These would make such delightful gifts.
Country Hill Cottage
Wednesday 20th of March 2019
Thanks a lot, Kyla! Yes, they are perfect for gift giving. xx
Stacey @ The Sugar Coated Cottage
Tuesday 19th of March 2019
These are the prettiest bath bombs! I love speckles ;-) . So fun! Take care.
Country Hill Cottage
Tuesday 19th of March 2019
Thanks you so much, Stacey! They were a lot of fun to make! xx