

Homemade peanut butter eggs are the ultimate no-bake Easter treat. They are covered in chocolate and have a smooth, creamy peanut butter filling. Why wait for Reese’s peanut butter eggs to be stocked, when you can make this easy recipe with only 6 ingredients at home?
They are on top of my spring list, along with Easter egg cheesecake, chocolate cornflake nests, and Easter fudge.
Homemade peanut butter eggs
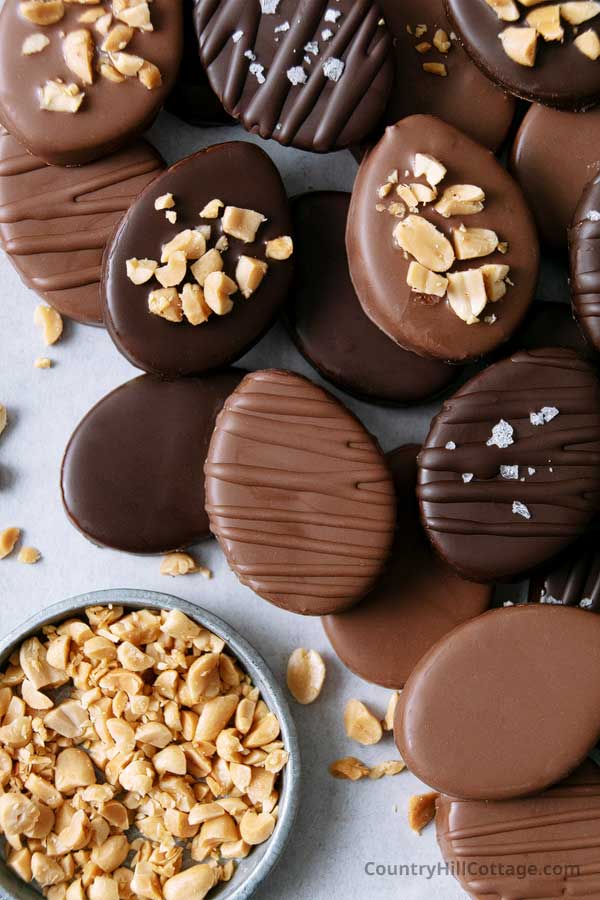
If you enjoy Reese’s peanut butter eggs, you’ll love this homemade version! Every bite is pure peanut butter chocolate bliss!
The peanut butter filling is rich and creamy and tastes perfectly sweet and salty – exactly like Reese’s. They are finished with a smooth chocolate coating that beautifully covers each egg.
The recipe calls for basic pantry staples and is super easy to make, which means they are a great last-minute treat.
Everyone will love this delicious Easter candy! You could hand them out as gifts. Or, more realistically, hoard a stash at the back of the fridge like I would.
Want more peanut butter goodness? Give our peanut butter cookies, peanut butter fudge, or peanut butter bread a try next.
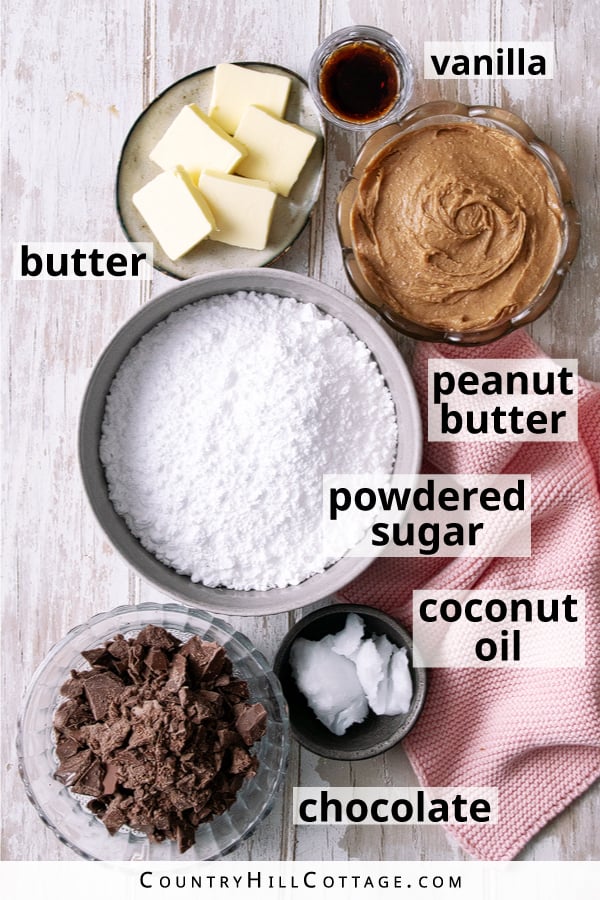
Ingredients
The recipe makes 30 to 36 peanut butter eggs. You likely have most of the ingredients already at home.
- 1 cup creamy peanut butter – Please use a creamy, no-stir peanut butter like Skippy or Jiff. Natural peanut butter isn’t suitable for this recipe because the excess oil will prevent the eggs from setting.
- 5 tablespoons salted butter – helps to create a smooth, melt-in-your-mouth texture. Let the butter soften to room temperature.
- 2 cups powdered sugar – adds sweetness and binds the peanut butter to create a rollable dough. Sift it so that the peanut butter mixture isn’t lumpy.
- 2 teaspoons vanilla extract
Chocolate coating
- 12 oz chopped chocolate – I highly recommend chopped baking chocolate bars or melting wafers for the coating. Chocolate chips contain stabilizers and don’t melt well. You are welcome to use any chocolate flavor. Milk chocolate tastes closest to Reese’s. We also love semisweet and dark chocolate to offset the sweetness of the filling.
- 2 teaspoons coconut oil – helps to thin out the chocolate to make dipping easier. Vegetable shortening works too.

Topping ideas
It’s so much fun to decorate your chocolate peanut butter eggs. Here are a few ideas to inspire you:
- Chocolate drizzle: Fill melted chocolate into a pastry bag and drizzle over your eggs. Top with the same chocolate you used for dipping, or opt for a contrasting color (e.g., white chocolate).
- Candy melts: Swap the chocolate for colorful candy melts. The eggs will look lovely with a pink, light blue, yellow, or spring green shell.
- Chopped peanuts: Garnish your peanut butter eggs with chopped salted roasted peanuts. It’s a great way to add some crunch and amp up the peanut flavor.
- Nonpareils: These cute mini sprinkles are the perfect finish for peanut butter Easter eggs. Pretty and simple!
- Sprinkles: Kids love colorful sprinkles! Pastel rainbow jimmies or confetti sprinkles are pretty for Easter.
- Flaky sea salt: For the ultimate sweet-salty treat, sprinkle Maldon sea salt flakes over the eggs. I’d say this more for the grown-up Reese’s lovers in your life.
Short cut
If you don’t have the time to make peanut butter eggs from scratch, pick up a few packages of Reese’s peanut butter eggs at the store and decorate them at home. It’s a fun activity for kids and a clever way to turn store-bought candy into something special for Easter.
How to make peanut butter eggs
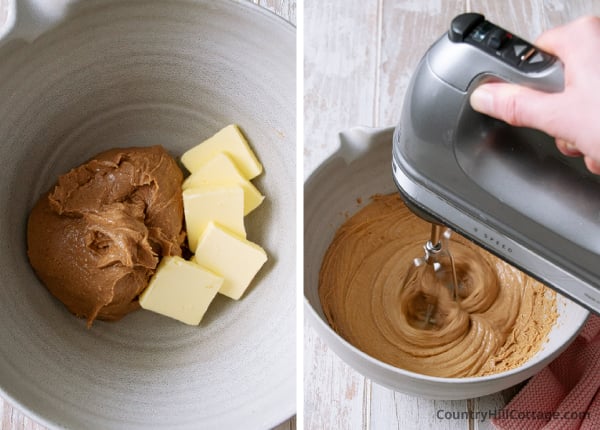
1. Make the filling
Add the peanut butter and softened butter to a large mixing bowl. Using an electric mixer, beat until the mixture is smooth and creamy, about 1 to 2 minutes. You can also use a stand mixer fitted with the paddle attachment.
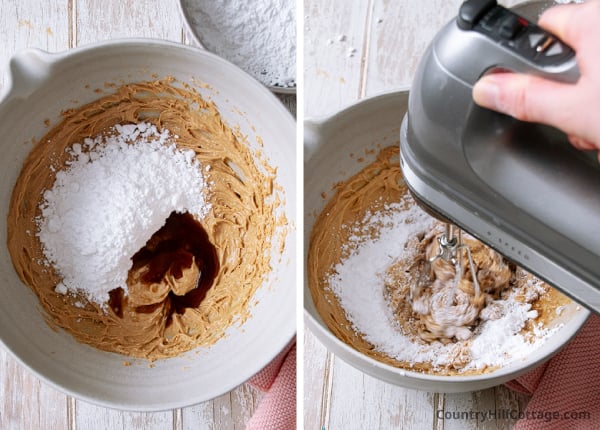
2. Incorporate powdered sugar
Add half of the powdered sugar and vanilla extract and mix on low speed until combined. Scrape down the sides of the bowl with a rubber spatula. Mix in the remaining powdered sugar. Scrape the bowl again.

3. Check the consistency
At this point, the mixture will appear crumbly and a bit dry. To check the consistency, press a spoonful in the palm of your hand. The mixture is perfect when it is pliable, looks smooth, and holds its form.
If the consistency isn’t quite right, here are some ways to adjust it:
- Too crumbly: If the mixture is too dry and doesn’t hold its shape, add 1 to 2 teaspoons of milk or water until the dough comes together and becomes pliable.
- Too soft: If the mixture seems a bit too soft and sticky, pop the bowl in the fridge for 15 to 20 minutes before trying again.
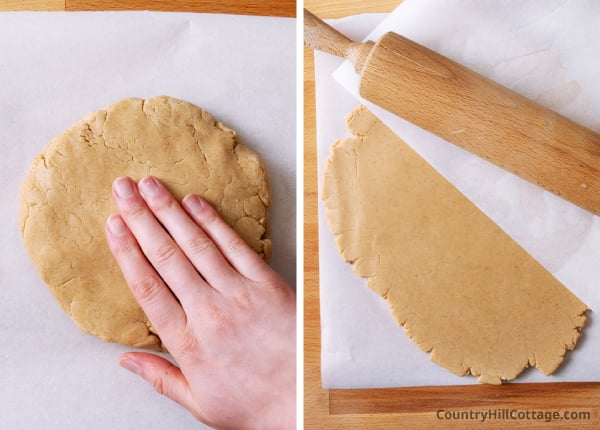
4. Roll out the mixture
Shape the peanut butter mixture into a ball. Using your hands, flatten the ball into a disk. Then roll the dough between 2 sheets of parchment paper until 3/4-inch thick. If the mixture is too soft, chill it in the refrigerator for 30 minutes to firm up.
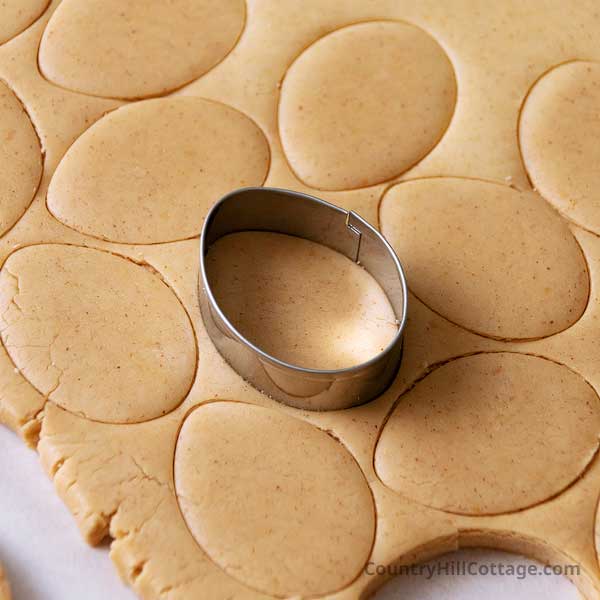
5. Cut-out & chill egg shapes
Using a 2-inch egg-shaped cutter, cut out eggs from the peanut butter filling. Re-roll any scrapes to cut out more eggs. Place them on a lined cookie sheet and chill for at least 30 minutes.
Make-ahead tip: While I recommend a 30-minute chill time, you can keep the eggs in the fridge overnight and continue the next day. Cover the cookie sheet with plastic wrap to prevent the eggs from drying out.
Shape peanut butter eggs by hand
If you don’t have a cutter, you can easily shape your peanut butter eggs by hand. Scoop 1.5 tablespoons of mixture into your hand and roll into a ball.
Next, flatten the ball between your palms until 3/4 inch thick. To create the egg shape, use your fingers to narrow one end but leave the other end wide.
6. Melt chocolate
Add the chocolate and coconut oil to a medium glass bowl. Melt in the microwave (50% power) in 30-second intervals, stirring between heatings, until liquid.
Make sure the chocolate isn’t too warm: The chocolate should have a liquid, runny consistency, but not too hot because it will melt the eggs. If too warm, let it sit on the counter to cool for a few minutes.
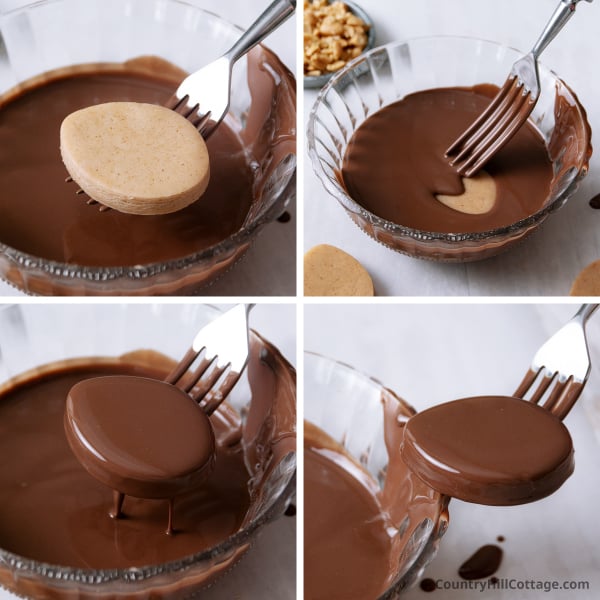
7. Dip the peanut butter eggs
Place a chilled peanut butter egg on a fork and submerge in the melted chocolate. Lift it out and carefully tap on the edge of the bowl to remove any excess chocolate from the bottom.
Place the chocolate-coated peanut butter eggs back on the baking sheet. Repeat with the remaining eggs. Let the chocolate firm up and enjoy!
Re-warm the chocolate as needed: If the chocolate becomes too thick for dipping, pop it in the microwave for 20 seconds to re-melt.

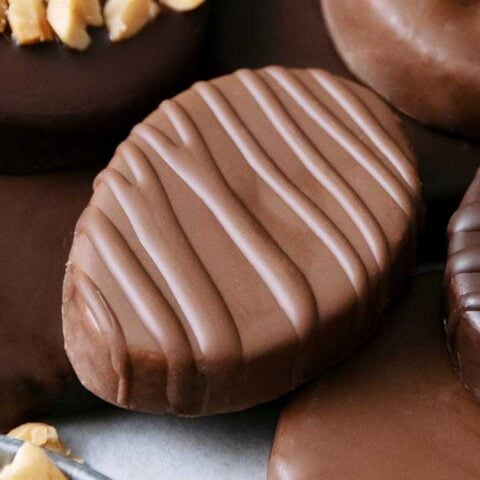
8. Decorate
To keep the peanut butter eggs as close to the original as possible, just dip them in chocolate. But why stop there when you can decorate them and create beautiful Easter candies?
Chocolate drizzle: Coat the eggs and let the chocolate set. Then, add any leftover chocolate to a piping bag or zip-top bag (re-warm if needed). Snip off the corner and drizzle over the peanut butter eggs.
Add sprinkles/nuts right after dipping: The chocolate coating sets quickly, so scatter on sprinkles or chopped peanuts immediately after dipping while the chocolate is still wet.

Gift peanut butter eggs
Homemade peanut butter eggs are great to share on a dessert platter or put in someone’s Easter basket. To package, put them in individual cellophane bags and tie them with a ribbon. Now, you have a lovely basket stuffer and Easter brunch favor for guests to take home.
Storage instructions
- Room temperature: Once the chocolate coating has set, transfer your peanut butter eggs into an airtight container. I recommend placing sheets of parchment paper between layers so the eggs don’t stick together. They will be good at room temperature for up to 4 days.
- Refrigerator: They keep well sealed in the fridge for up to 2 weeks.
- Freezer: You can also freeze them for up to 3 months. They taste delicious frozen!
More Easter treats
Peanut Butter Eggs Recipe
Homemade peanut butter eggs are the ultimate no-bake Easter treat. They are covered in chocolate and have a smooth, creamy peanut butter filling. Why wait for Reese's peanut butter eggs to be stocked, when you can make this easy recipe with only 6 ingredients at home?
Ingredients
- 1 cup / 250 g / 8.8 oz creamy peanut butter
- 5 tbsp / 70 g / 2.5 oz salted butter
- 1 tsp vanilla extract
- 2 cups / 240 g / 8.5 oz powdered sugar
- 12 oz / 340 g chocolate bars, roughly chopped
- 2 tsp coconut oil (or vegetable shortening)
Instructions
- Make the filling. Add the peanut butter and softened butter to a large mixing bowl. Using an electric mixer, beat until the mixture is smooth and creamy, about 1 to 2 minutes. You can also use a stand mixer fitted with the paddle attachment.
- Incorporate powdered sugar. Add half of the powdered sugar and vanilla extract and mix on low speed until combined. Scrape down the sides of the bowl with a rubber spatula. Mix in the remaining powdered sugar. Scrape the bowl again. To check the consistency, press a spoonful in the palm of your hand. The mixture is perfect when it is pliable, looks smooth, and holds its form.
- Roll out the mixture. Shape the peanut butter mixture into a ball. Using your hands, flatten the ball into a disk. Then roll the dough between 2 sheets of parchment paper until 3/4-inch thick. If the mixture is too soft, chill it in the refrigerator for 30 minutes to firm up.
- Cut-out & chill egg shapes. Using a 2-inch egg-shaped cutter, cut out eggs from the peanut butter filling. Re-roll any scrapes to cut out more eggs. Place them on a lined cookie sheet and chill for at least 30 minutes.
- Melt chocolate. Add the chocolate and coconut oil to a medium glass bowl. Melt in the microwave (50% power) in 30-second intervals, stirring between heatings, until liquid.
- Dip the peanut butter eggs. Place a chilled peanut butter egg on a fork and submerge in the melted chocolate. Lift it out and carefully tap on the edge of the bowl to remove any excess chocolate from the bottom. Place the chocolate-coated peanut butter eggs back on the baking sheet. Repeat with the remaining eggs. Let the chocolate firm up and enjoy!
- Decorate. To keep the peanut butter eggs as close to the original as possible, just dip them in chocolate. For a chocolate drizzle, add any leftover chocolate to a piping bag or zip-top bag (re-warm if needed). Snip off the corner and drizzle over the peanut butter eggs. The chocolate coating sets quickly, so scatter on any sprinkles or chopped peanuts immediately after dipping while the chocolate is still wet.
Notes
Avoid natural peanut butter: Please use a creamy, no-stir peanut butter like Skippy or Jiff. Natural peanut butter isn't suitable for this recipe because the excess oil will prevent the eggs from setting.
Baking chocolate: I highly recommend chopped baking chocolate bars or melting wafers for the coating. Chocolate chips contain stabilizers and don't melt well. You are welcome to use any chocolate flavor. Milk chocolate tastes closest to Reese's. We also love semisweet and dark chocolate to offset the sweetness of the filling.
Adjust consistency
- Too crumbly: If the mixture is too dry and doesn't hold its shape, add 1 to 2 teaspoons of milk or water until the dough comes together and becomes pliable.
- Too soft: If the mixture seems a bit too soft and sticky, pop the bowl in the fridge for 15 to 20 minutes before trying again.
Shape peanut butter eggs by hand: If you don't have a cutter, you can easily shape your peanut butter eggs by hand. Scoop 1.5 tablespoons of mixture into your hand and roll into a ball. Next, flatten the ball between your palms until 3/4 inch thick. To create the egg shape, use your fingers to narrow one end but leave the other end wide.
Make sure the chocolate isn't too warm: The chocolate should have a liquid, runny consistency, but not too hot because it will melt the eggs. If too warm, let it sit on the counter to cool for a few minutes.
Re-warm the chocolate as needed: If the chocolate becomes too thick for dipping, pop it in the microwave for 20 seconds to re-melt.
Make-ahead: While I recommend a 30-minute chill time, you can keep the eggs in the fridge overnight and continue the next day. Cover the cookie sheet with plastic wrap to prevent the eggs from drying out.
Nutrition Information:
Yield: 30 Serving Size: 1Amount Per Serving: Calories: 161Total Fat: 10gSaturated Fat: 4gTrans Fat: 0gUnsaturated Fat: 4gCholesterol: 8mgSodium: 64mgCarbohydrates: 17gFiber: 1gSugar: 14gProtein: 3g


