Learn how to make beautiful gold marble DIY coasters that look like Anthropologie agate coasters! Homemade coasters are fun and easy and make a stunning handmade gift for friends and family. The handmade coasters are marbleized with nail polish and are finished in no time. This simple DIY project can be made with wooden coasters or ceramic tiles. A great craft for adults and kids!

Disclosure: This post contains affiliate links, meaning, at no additional cost to you, we will earn a small commission if you click through and make a purchase. Learn more
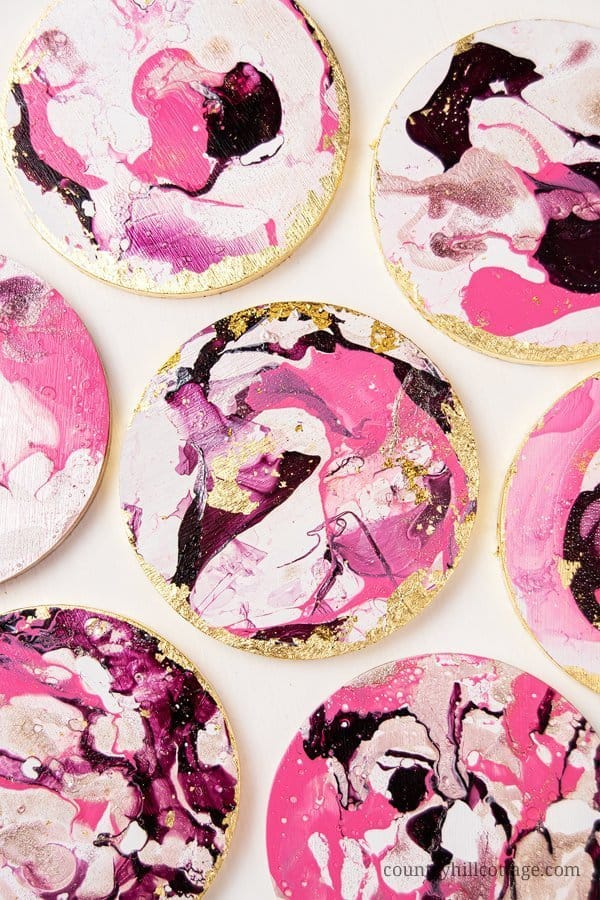
Gold marble DIY coasters
This DIY coasters craft idea is as easy as it gets. DIY marble coaster with nail polish can be ready in less than 15 minutes, and even non-crafters can do it easily. Literally, all you have to do is to drop some nail polish into a bowl full of water and coat your coasters. It’s easy enough to make this DIY coaster idea even if you’re new to marbleizing with nail polish. Stupid simple!
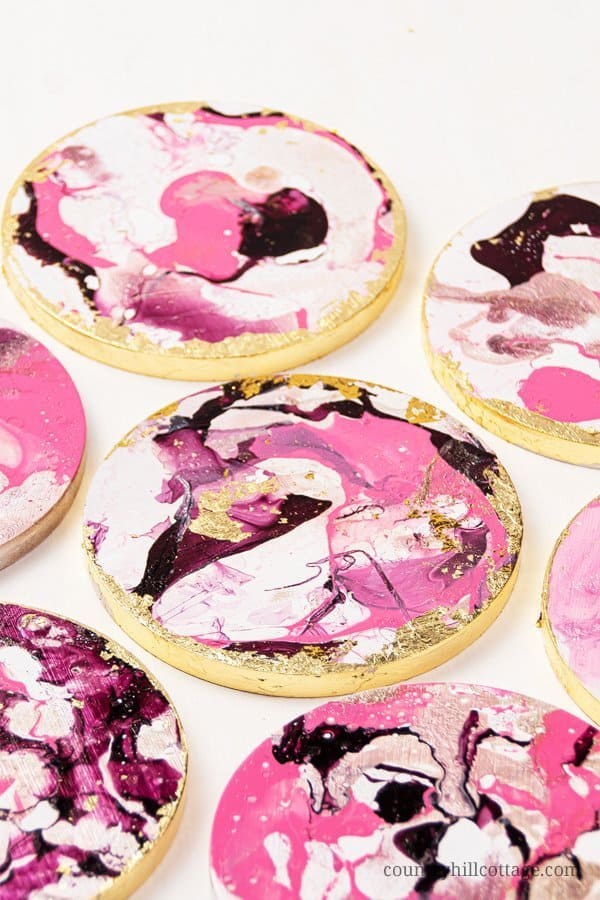
I choose to keep the colour palette to light, medium and dark pinks with a little glitter polish to resemble the look of an agate crystal. And for the piece de resistance, we’ll add a shimmer gold leaf rim to give our DIY marbled coasters the irresistible Anthropologie agate coaster look.

Ceramic tiles or wooden coasters for marble DIY coasters?
Ceramic tiles or wooden coaster? I wanted round coasters and bought round wooden coasters, but tiles work just as beautifully for DIY coasters.
What type of nail polish should I use for marbleizing?
Almost any type of regular nail polish should work. I don’t recommend polish for gel nails because it needs UV light to harden. And new nail polish will work better than an older, slightly drier product.
You can choose any colours you like. The coasters will look best if you use contrasting colours, light and dark hues. For added visual interest, mix matte, glossy, and glittery nail polishes. I used a combination of pastel pink, hot pink, a deep mauve a shimmer lilac colour and a rose gold glitter nail polish.
How to make DIY marble coasters with nail polish
These gorgeous gold marble DIY coasters are stylish home accessories and a great causal craft. They also make wonderful DIY gifts. Here are the easy steps to get you started on how to make marble DIY coasters with a gold rim:
1) Paint wooden coaster
If using wooden coasters, paint them white. You can either spray paint them or apply acrylic paint with a brush. Let dry for 10 to 20 minutes. If you’re using ceramic tiles, skip this step.
2) Set up a container with water
Fill a disposable container with room-temperature water. A deep paper plate, old Tupperware or an aluminium pan works best. Use something that can be discarded afterwards because dried nail polish can be stubborn to remove.
3) Add the nail polish
Next, drop a few droplets nail polish on the water. Pour closely to the water surface, so the nail polish doesn’t skin down. You can very lightly run a skewer through the colours to create a marble pattern.
4) Marbleize the coaster
Quickly dip the coaster with the top facing down into the water. Try to dunk the coaster as flat as possible to avoid air bubbles and clumps but don’t emerge the coasters completely.
5) Dry marble DIY coaster
Carefully turn the marbled coaster around and dry on paper towels, for 30 to 60 minutes. The drying time will vary by nail polish.
6) Apply the gold rim (optional)
Once the marble coasters are dry, painted the rim with metal leaf adhesive and let dry for 20 to 30 minutes. Once the primer feels tacky, lay the gold leaf flat on the rim. Gently rub the foil against the rim until completely covered.
7) Seal the coasters
To protect the coasters from water, seal the surface with a clear sealant or Modge Podge.
And there you have it, beautiful gold marble coaster!

How to host a craft party for ladies and make marble DIY coasters
Looking for crafts for adults and wondering how to throw a craft party? DIY coasters are not only lovely to look at, but they are also a fantastic project for a craft party for women, girls and boys, or teens. When you host a craft party, you want a simple project as your guest will have different levels of craft experience. The coasters have everything you could want in a party craft idea.
Making coasters is easy and quick, even the not-so-crafty can do this. The materials are inexpensive and widely available, so making DIY marble coasters with your friends won’t break the bank. Your guest can sit around a big table and chat while they marbleize the coaster with nail polish. At the end of the party, every participant can take a little trinket home to enjoy and remember your event.
Tips for hosting a craft party
I have put together a few tips that help you to organise and host the best craft party and be a great hostess:
- Stock up on supplies and make sure you have enough for every guest. Buy different nail polish colours, so your guests have lots of options.
- For a party, you may pre-paint the wooden coaster or use tiles.
- Before the party, take some time to set everything up. Make sure the table is big enough for the number of guests and have a plastic cover or old newspaper ready to protect the work surface.
- Have lost of paper towels and trash bins ready to make clean up simple. Put a jar with water for used brushes on the table, so the bristle doesn’t dry out.
- Have snacks and drinks ready. Set up the food separate from the craft station
- Last but certainly not least, enjoy yourself and have fun! Being a perfectionist, I often get caught up in hosting duties and sometimes forget to just enjoy the moment.
For another party craft idea, try these DIY gold leaf painted rocks.


Easy Marble DIY Coasters with Nail Polish – Cute Homemade Coaster Idea
Learn how to make beautiful gold marble DIY coasters that look like Anthropologie agate coasters! Homemade coasters are fun and easy and make a stunning handmade gift for friends and family. The handmade coasters are marbleized with nail polish and are finished in no time. This simple DIY project can be made with wooden coasters or ceramic tiles. A great craft for adults and kids!
Materials
Marble DIY Coasters
- 6 wooden coaster
- OR
- 6 white tiles
- white acrylic colour
- nail polish in different colours
- clear sealer
- paper towels
- nail polish remover
- plastic cover or old newspaper to protect the work surface
Tools
- paper plates or a disposable container
- wooden skewer
- disposable gloves
- medium soft, flat brush
- small round paintbrush
Instructions
- Paint the top and sides of the wooden coaster with white acrylic paint. Apply the paint in a thin, even layer. Set aside until dry. If you can see still wood shine through, apply another coat of white paint. Skip this step if using white ceramic tiles.
- Fill a deep paper plate or disposable container with room-temperature water.
- Put on disposable gloves.
- Add a few drops of different nail polishes. Drop closely to the water surface, so the nail polish doesn’t skin down.
- Working fast, dip the coaster into the water with the top facing down. Try to dunk the coaster as flat as possible to avoid air bubbles and clumps.
- Carefully turn the marbled coaster around and dry on paper towels, for 30 to 60 minutes. The drying time will vary by nail polish.
- Once the marble coasters are dry, optionally painted the rim with metal leaf adhesive paint. Let dry.
- Once the surface feels tacky, cover the rim with gold leaf and gently rub to apply.
- To protect the coasters from water, seal the surface with a clear sealant or Modge Podge.
More party craft ideas
Carolina from 30 Minute Crafts, Angie from The Country Chic Cottage, and Cori from Hey Let’s Make Stuff have put together more inspiring party craft ideas that can be done in 15 minutes or less. Tab the image below to check it out!
Over to you!
Thanks so much for visiting Country Hill Cottage – we’re so happy you’re here! Have some feedback you’d like to share? Leave a note in the comment section below!
If you enjoyed this post, please share it using the social media buttons you see next to the post.
For more crafts, beauty DIYs and recipe, follow us on Pinterest, YouTube, Instagram, and Facebook.
Cyna xo


Rebecca Payne
Friday 12th of November 2021
I love these coasters. Great Job!
Cyna | Country Hill Cottage
Friday 12th of November 2021
Thank you so much, Rebecca!
francesca
Monday 13th of April 2020
Oh my goodness, these coasters look adorable ♥ I will make these asap!
Cyna | Country Hill Cottage
Monday 13th of April 2020
Thanks so much, Francesca!