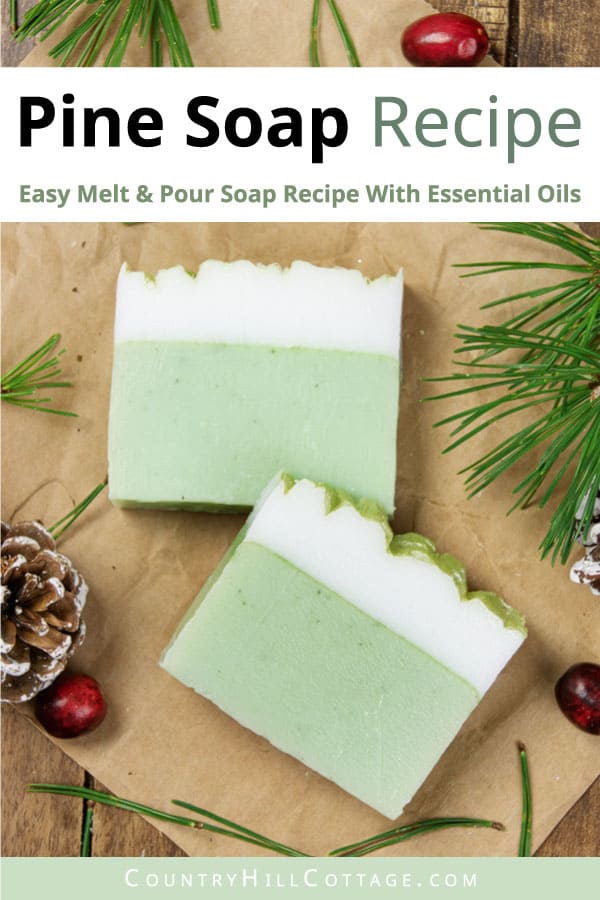
This pine soap is intensely aromatic and cleanses with a creamy lather. The soap recipe celebrates everything there is to love about homemade soap. It starts with a melt-and-pour base infused with skin-loving pine oil and essential oils for a natural forest scent.

Disclosure: This post contains affiliate links, meaning, at no additional cost to you, we will earn a small commission if you click through and make a purchase. Learn more
The inspiration behind this pine-scented soap
A little backstory: Last year, Colleen from Grow Forage Cook Ferment shared a beautiful cold process winter spice pine soap. I’ve been loving her soap ever since seeing it for the first time and dreamed about creating a melt-and-pour version. And this is it!
(I explain the difference between cold process and melt-and-pour soap in the FAQ section in case you’re interested.)
After several weeks of testing, I’m proud to present this pine soap recipe. It has a rich lather, cleanses gently, and is gorgeous on the eyes. Of course, the best part is the wonderfully fragrant pine scent. The soap smells just like a Christmas tree, and you are going to love it!
You could pour the soap into a simple soap mold and call it a day. But I wanted something special and decided to create a layered soap. A green base is topped with a snowy white layer embossed with a tree bark design and embellished with a sparkly shimmer. Oh-so festive, right?
Looking for more Christmas soap inspiration? Try my cinnamon soap, candy cane soap, gingerbread soap rounds, and these frosted cranberry soap bars.

Benefits of pine soap
The soap features pine in different ways. First, we have a moisturizing pine infusion. And then there’s the fragrant pine essential oil. Here are the potential skincare benefits this soap has to offer:
- Soothing: Pine essential oil is touted as possessing anti-inflammatory properties and may ease acne, eczema, and other inflammatory skin conditions.
- Antioxidant: Pine has remarkable antioxidant activity and scavenges free radicals. Free radicals attack healthy skin cells and collagen, leading to premature aging and wrinkles.
- Antimicrobial: Studies show that pine needle oil is also a natural antimicrobial agent and can potentially minimize harmful bacteria on the skin.
- May support wound healing: Another study concluded that pine essential oil may help treat abrasions, cuts, and minor wounds.
- Relaxing: Pine oil is also an analgesic and may relax tired muscles and alleviate achy joints.
- Christmas tree scent: The oil has a strong, uplifting aroma and smells just like a fresh Christmas tree. Absolutely delightful!
- Giftable: This melt and pour soap recipe makes a large batch and is perfect for gift giving. The materials aren’t too expensive, so you can get a lot of homemade holiday gifts at a reasonable price.
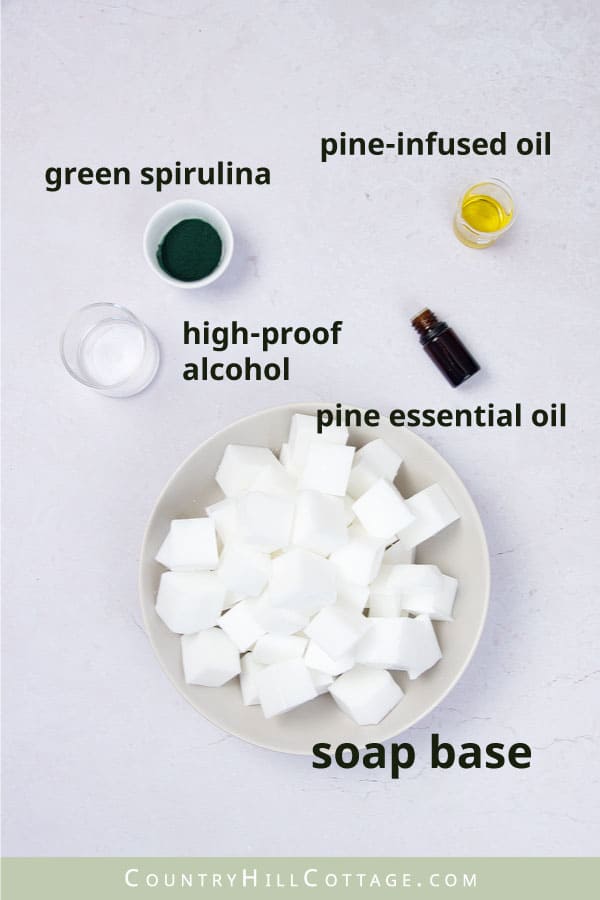
Ingredients and supplies
Let’s talk about the natural soap ingredients! First, we’ll go over the essentials, and then we’ll cover the tools needed for this soap making project:
- Pine essential oil, also known as Scots pine, is responsible for the forest-like scent. The oil is pretty mild and suitable for all skin types and even children. Be sure to purchase a high-quality oil from a reputable essential oil company.
- Pine infused oil (optional): I created a simple pine oil by infusing jojoba oil with foraged pine needles. You can use any carrier oil of your choice or skip it.
- Soap base: Any soap base will do such as goat’s milk, olive oil, or glycerin. The product you see in the photos was made with a shea butter melt and pour soap.
- Green spirulina powder: The algae powder gives the soap a natural green color. Spirulina is rich in essential amino acids and countless nutrients, making it an excellent addition to skin care.
- Light green mica (optional): I brushed a tiny amount of green mica across the top to give my soap bars an exquisite shimmer effect.
- High-proof alcohol (optional) helps dissolve bubbles, dilute the spirulina powder, and adhere the soap layers together. Use something like rubbing alcohol, ethanol, or 190-proof Everclear.
Tools
- Soap mold consists of a flexible silicone inlay and a sturdy wooden box that holds the mold. It’s a large, 42-oz / 1200 ml mold, and you will get 12 to 13 soap bars out of it.
- Fondant texture mat (optional) imprints an interesting tree bark texture into the soap.
- Soap cutter (optional) to cut individual soap bars. You can cut the soap bars with a large kitchen knife, but a soap cutter makes it easier to create evenly sized bars.
- Digital scale to measure the ingredients.
- Cutting board and paring knife to chop up the soap.
- Large measuring cup to melt the soap base.
- Metal spoon to combine ingredients and pour the soap.
- Fine mister spray bottle to disperse the high-proof alcohol.
- Soft, flat brush to apply the mica powder.
- Scissors to trim the texture mat.
- Mason jar to infuse the pine oil.
The soap mold and soap cutter can be bought individually or as a soap-making kit, which will save you a few bucks.

How to make pine oil
Like Colleen, I added a pine-infused herbal oil to my soap. Making pine oil is really easy and can be done with fresh or dried pine needles. Follow these steps:
- Place your pine needles into a 4-oz / 115 ml mason jar. You need approx. 1/8 cup of needles.
- Fill the jar with 1/4 cup carrier oil. Any carrier oil will work. I used jojoba oil.
- Place the jar into a small saucepan filled 1/2 in / 1 cm with water.
- Bring the water to a mild simmer.
- Let infuse for 20 minutes, check regularly, and add more water as needed.
- After 20 minutes, strain the pine oil through a fine-mesh sieve. Discard the needles.
You can prepare infused oil with the needles of other conifer trees, such as spruce, fir, or juniper.

Pine soap scents
I scented my soap with pure pine essential oil for a simple yet refreshing forest scent. If you prefer a more complex soap scent, consider one of the following blends. They are similar to the ones I shared in my pine candle tutorial.
- Holiday Tree: 50 drops Scots pine + 32 drops balsam fir + 15 drops cinnamon leaf + 10 drops sweet orange
- Winter Woods: 60 drops Scots pine + 30 drops black spruce + 20 drops wintergreen
- Balsam Forest: 43 drops Scots pine + 32 drops balsam fir + 22 drops cedarwood + 8 drops frankincense
- Peppermint Pine: 80 drops Scots pine + 45 drops peppermint
- Pine Needle Dew: 60 drops Scots pine + 30 drops tangerine + 18 drops peppermint
How to make pine soap
This pine soap recipe will take some time to put together. It’s a bit more involved than some of my other melt-and-pour soap recipes, but I promise you, the soap is worth the wait!
Also, the soap is relatively easy to whip together – most of the time is dedicated to waiting for the layers to cool. Here’s an in-depth explanation of each step:
Step 1: Cut texture mat
- I used a silicone texture mat to emboss a wood bark effect into the soap. You need to cut the texture mat to fit the mold.
- Cut 2 pieces from the texture mat that have the following dimensions: 5.9 in x 2.8 in / 15.1 cm x 7.1 cm and 4.2 in x 2.8 in / 10.8 cm x 7.1 cm.
- I also recommend beveling the edges on the back of the mat to fit the mold better.
- The textured mat is soft, and regular household scissors will work well.
Step 2: Prep soap mold
- Place the trimmed texture pieces into the mold. Push the edges of the texture mat thoroughly down.
Step 3: Create and pour white layer
- Next, chop 14 oz / 400 g soap base into 1-in / 2.5 cm cubes.
- Transfer into a heat-resistant glass measuring cup and melt in the microwave in 30-second bursts. Stir the soap between each burst.
- Once fully melted, add 1 tsp / 5 g / 0.17 oz pine infused oil and 1/2 tsp / 2.5 g / 0.1 oz pine essential oil. Stir to combine.
- Pour into the prepared soap mold and spritz the top with alcohol to remove bubbles.
- Transfer the mold into the fridge and chill for 1 hour until solidified.
Step 4: Dilute spirulina powder
- In a small glass jar, combine 1/2 tsp spirulina powder and 1 tbsp high-proof alcohol.
- Mix until smooth.
- This mixture doesn’t smell particularly pleasant, but you won’t notice the odor in the finished soap. Set aside.
Step 5: Create green layer
- Cut 28.2 oz / 800 g soap base into 1-in / 2.5 cm blocks.
- Transfer into a heat-resistant glass measuring cup and melt in the microwave in 30-second intervals, stirring between each interval.
- Once fully melted, add 1 1/2 tsp / 7.5 g / 0.17 oz pine infused oil, 1 tsp / 5 g / 0.17 oz pine essential oil, and the diluted spirulina powder from step 4.
- Mix thoroughly to combine, and a uniform green color forms. Let cool for 5 minutes, stirring occasionally.
Step 6: Pour green layer
- Lightly spritz the white layer with alcohol.
- Pouring on a spoon, gently pour the green soap into the mold. Move along the mold as you go.
- Mist with alcohol to dissolve air bubbles.
- Chill the soap for 3 to 4 hours or overnight.
Step 7: Unmold soap
- Once fully hard, take the silicone mold out of the wood box.
- Then pull the mold from the soap to break the airlock.
- Draw back the silicone to release your pine needle soap.
- Finally, gently lift the texture mat from the soap block.
Step 8: Dust with mica (optional)
- Using a soft brush, dust the textured top with green mica. Pick up mica powder with your brush and run it across the soap block, getting into the ridges.
- Shake off excess mica.
Step 9: Cut soap bars
- Using a soap cutter, cut the block into individual soap bars.
- I adjusted my cutter to create 0.8 in / 2 cm thick soap bars.

Tips for success
- Measure your soap mold before cutting the texture mat. The inside of my soap mold was 10.3 in x 2.8 in / 26.2 cm x 7.1 cm, and I trimmed the mat according to these specifications. However, I recommend measuring your soap mold before cutting the texture mat to ensure it’s the same size.
- Use a digital scale to get precise measurements. Melt-and-pour soap is difficult to measure in cups, and I recommend employing a digital scale to get the exact quantities you need for this soap recipe.
- Protect your hands when melting the soap base. MP soap can become quite hot so wear oven mitts when handling the melted soap base.
- Spray the white soap with alcohol, so the soap layers stick together.
- Let the green soap cool to 135° / 55°C before pouring it over the white soap. If the soap base is hotter, it could melt into the white layer underneath. If the soap forms a skin, remove it with a spoon.
- Pour the green soap over a spoon to slow down the flow when adding it to mold.

Storage instructions
- Packaging: Melt and pour soap is prone to absorbing moisture from the surroundings. If living in an area with high humidity, be sure to wrap each pine soap bar tightly in plastic wrap/cling film to prevent this effect.
- Storage: Store your pine tree soap in a cool, dark location where it isn’t exposed to sunlight, for example, a lidded box or a cabinet.
- Shel life: Pine oil soap will keep well for at least 1 year.

Pine Soap Recipe
This pine soap is intensely aromatic and cleanses with a creamy lather. The soap recipe celebrates everything there is to love about homemade soap. It starts with a melt-and-pour base infused with skin-loving pine oil and essential oils for a natural forest scent.
Materials
- 42 oz / 1.2 kg melt-and-pour soap base, divided (any soap base is fine, I used shea butter)
- 2 1/2 tsp / 12.5 g / 0.44 oz pine infused oil, divided (see Notes below)
- 1 1/2 tsp / 140 drops / 7 g / 0.24 oz pine essential oil, divided
- 1/2 tsp green spirulina powder
- 1 tbsp/ 10 g / 0.35 oz high-proof alcohol
- 1/2 tsp light green mica (optional)
Tools
- digital scale
- cutting board
- paring knife
- large glass measuring cup
- 42-oz / 1200 ml soap mold
- texture mat with bark design
- adjustable soap cutter
- spray bottle
- metal spoon
- scissors
- soft, flat brush
Instructions
- Cut texture mat. I used a silicone texture mat to emboss a wood bark effect into the soap. You need to cut the texture mat to fit the mold. Cut 2 pieces from the texture mat that have the following dimensions: 5.9 in x 2.8 in / 15.1 cm x 7.1 cm and 4.2 in x 2.8 in / 10.8 cm x 7.1 cm. I also recommend beveling the edges on the back of the mat to fit the mold better. The textured mat is soft, and regular household scissors will work well.
- Prep soap mold. Place the trimmed texture pieces into the mold. Push the edges of the texture mat thoroughly down.
- Create and pour white layer. Next, chop 14 oz / 400 g soap base into 1-in / 2.5 cm cubes. Transfer into a heat-resistant glass measuring cup and melt in the microwave in 30-second bursts. Stir the soap between each burst. Once fully melted, add 1 tsp / 5 g / 0.17 oz pine infused oil and 1/2 tsp / 2.5 g / 0.1 oz pine essential oil. Stir to combine. Pour into the prepared soap mold and spritz the top with alcohol to remove bubbles. Transfer the mold into the fridge and chill for 1 hour until solidified.
- Dilute spirulina powder. In a small glass jar, combine 1/2 tsp spirulina powder and 1 tbsp high-proof alcohol. Mix until smooth. This mixture doesn’t smell particularly pleasant, but you won’t notice the odor in the finished soap. Set aside.
- Create green layer. Cut 28.2 oz / 800 g soap base into 1-in / 2.5 cm blocks. Transfer into a heat-resistant glass measuring cup and melt in the microwave in 30-second intervals, stirring between each interval. Once fully melted, add 1 1/2 tsp / 7.5 g / 0.17 oz pine infused oil, 1 tsp / 5 g / 0.17 oz pine essential oil, and the diluted spirulina powder from step 4. Mix thoroughly to combine, and a uniform green color forms. Let cool for 5 minutes, stirring occasionally.
- Pour green layer. Lightly spritz the white layer with alcohol. Pouring on a spoon, gently pour the green soap into the mold. Move along the mold as you go. Mist with alcohol to dissolve air bubbles. Chill the soap for 3 to 4 hours or overnight.
- Unmold soap. Once fully hard, take the silicone mold out of the wood box. Then pull the mold from the soap to break the airlock. Draw back the silicone to release your pine needle soap. Finally, gently lift the texture mat from the soap block.
- Dust with mica (optional). Using a soft brush, dust the textured top with green mica. Pick up mica powder with your brush and run it across the soap block, getting into the ridges. Shake off excess mica.
- Cut soap bars. Using a soap cutter, cut the block into individual soap bars. I adjusted my cutter to create 0.8 in / 2 cm thick soap bars.
Notes
How to make pine infused oil
To make pine oil, follow these steps:
- Place your pine needles into a 4-oz / 115 ml mason jar. You need approx. 1/8 cup of needles.
- Fill the jar with 1/4 cup carrier oil. Any carrier oil will work. I used jojoba oil.
- Place the jar into a small saucepan filled 1/2 in / 1 cm with water.
- Bring the water to a mild simmer.
- Let infuse for 20 minutes, check regularly, and add more water as needed.
- After 20 minutes, strain the pine oil through a fine-mesh sieve. Discard the needles.


FAQ
Can I use another conifer essential oil?
Of course! Feel free to swap up Scotch pine for any other conifer essential oil you like or have available. Fir needle, Balsam fir, Douglas fir, black spruce, and cedarwood are suitable substitutes for pine.
Do you need fresh or dry pine needles for the oil infusion?
You can prepare pine oil with both fresh and dried pine needles. Pine needles dry within 2 to 3 weeks Simply lay them out on a baking sheet (tray) and wait until they look dry and the color has faded.
Can I make a cold infusion?
Of course! The pine oil recipe I shared above uses a hot infusion method where the oil is heated to extract the essential oils from the tree needles. I like this method because it is quick.
In a cold infusion, the oil isn’t heated. Instead, the plant materials soak in the oil for several weeks. Cold infusing will give you even more benefits but takes longer.
Here is what you do:
- Add your pine needles into a jar and cover with oil.
- Close the jar tightly and gently shake to ensure the conifer needles are covered in oil.
- Store the jar in a dry, cool location away from direct sunlight.
- Let infuse for 2 to 3 weeks.
- Shake the jar every few days. Open the jar to push the needles under the oil.
- Strain and use in soap and skincare recipes.
What’s the difference between melt and pour soap and cold process soap?
I mentioned in the intro that my melt-and-pour pine soap is inspired by a cold process soap recipe from Grow Forage Cook Ferment. So, how are melt-and-pour and cold process soap different?
- Cold process soap is made entirely from scratch. The process requires you to combine oils and lye, referred to as saponification. Cold process allows for many customizations but needs several weeks to cure.
- Melt and pour soap is prepared with a premade soap base that has already gone through the saponification process. You melt and pour it and have a finished product within a few hours. Yet, you have fewer options to customize your soap.


