

See how to make DIY candy cane soap! This easy peppermint soap recipe is made with melt and pour soap and essential oils. The Christmas soap looks very festive and is a great homemade holiday gift idea.

Disclosure: This post contains affiliate links, meaning, at no additional cost to you, we will earn a small commission if you click through and make a purchase. Learn more
DIY Peppermint Soap – Homemade Christmas Soap Recipe
One of my favourite things about coming up with beginners goat milk soap recipes is that everyone can make this Christmas soap. You don’t have to be an expert at homemade soap making to create melt and pour holiday soaps.
Before trying this homemade soap recipe, read my tips, so you get a great looking DIY peppermint soap with peppermint essential oil. Making peppermint Christmas soap is easy, but you need a little patience for this candy cane melt and pour soap recipe.
And for more DIY Christmas soap ideas and winter soap recipes, have a look at my moisturizing soap and this cute gingerbread soap recipe.
Materials for DIY Christmas soap
This easy peppermint soap is made up of affordable ingredients that you can buy online or in craft stores. Here is what need for this easy beginner’s soap recipe:
- goat milk melt and pour soap base – One of my favourite melt and pour soap bases. It’s has a nice lather and is very hydrating.
- clear melt and pour soap base – I used a clear soap base to make the red layers because a clear base creates brighter colours. A white soap base works, too, but the layers will appear more muted.
- red mica – I chose mice because it gives a strong and stable colour without bleeding or fading.
- spritz bottle andrubbing alcohol – Rubbing alcohol in a small spritz bottle is needed to dissolve bubbles and ensure that layers stick together.
- peppermint essential oil – Of course, we need peppermint essential oil to give the soap a natural mint fragrance.

Tools and supplies to make peppermint soap
For the best Christmas hand soap use the following supplies and tools:
- square silicone soap mould – This silicone mould allows to make Christmas soap on a small scale. The amounts in this homemade soap recipe are intended for this specific mould. If you use a different mould your soap may look differently.
- digital scale – I recommend using a digital scale to measure the ingredients precisely.
- cutting board and knife – A cutting board and sharp kitchen knife are useful for chopping up the melt and pour soap.
- measuring cups – Heatproof measuring cups are perfect for melting and pouring our melt and pour base. If you have, use two measuring cups so you don’t have to wash the mould after each pour.
- whisk – A balloon whisk helps to mix and combine the ingredients.
- laser thermometer – To achieve clean and straight layers, a thermometer has to be used to pour at the correct temperature.
How to make the candy cane soap – Holiday soap tutorial
A little patience is required for this candy cane holiday soap. Each layer has to cool completely before continuing with the next pour. Luckily, melt and pour soap sets quickly and it took me about 3.5 hours to make the soap from start of finish.
Here’s how to make candy cane soap at home:
Melt the soap base
- Cut soap base. Cut 3.5 oz / 100 g clear melt and pour soap into small cubes. The smaller the cubes are, the quicker the soap melts, and you also reduce the risk of burnt soap.
- Melt soap. Transfer the soap cubes into a large, microwave-safe measuring cup. Melt in the microwave set to 50% power in 30-second bursts, stirring well after each interval.
- Add essential oil and colourant. Once the soap is completely melted, stir in 5 drops peppermint essential oil and 1/8 tsp red mica. Give the soap a good stir.
Layer the candy cane soap
Create the red and white candy cane layers isn’t difficult but be sure to read my tips below to achieve the best results.
- Prep work. Put the soap mould on a cutting tray so it can be moved easily. Spray the mould with alcohol.
- Pour soap. Pour the melted soap into the mould cavity and spritz with alcohol to dissolve bubbles.
- Chill soap. Carefully transfer into the refrigerator for 30 minutes or until the soap has set. You can tell that the soap is ready when the centre of the soap feels solid.
- Create more layers. Repeat this process with alternating layers of white and red soap base. I used 3.5 oz / 100 g of soap for each layer.
- Refrigerate the soap after every pour. If you follow the recipe, you should end up with 6 layers, 3 red and 3 white. Tip: To ensure that the red layers have all the same colour, add the exact amount of red mica to each pour.
I have created a graphic so you can see each layer:

Tips for layering melt and pour soap
Using the right techniques, you will have a beautiful melt and pour soap with crisp layers in no time.
- Let each layer harden. Wait until the bottom layer is completely cool and solid before adding another layer. I put the soap in the fridge for 25 to 30 minutes so it hardens quickly.
- Pour at the right temperature. Let the melted soap cool to 122 – 120°F/ 50 – 48°C before pouring. If the soap is too hot, it will melt the layer below.
- Spritz with alcohol. Lightly spray rubbing alcohol immediately before each pour, which helps the two layers stick together. If the alcohol is spritzed too early, it can evaporate. You want the soap layer covered with alcohol, but not completely soaked.
- A quick spritz after pouring dissolves air bubbles.
- Before cutting the soap into bars wait until the soap block has fully cooled.
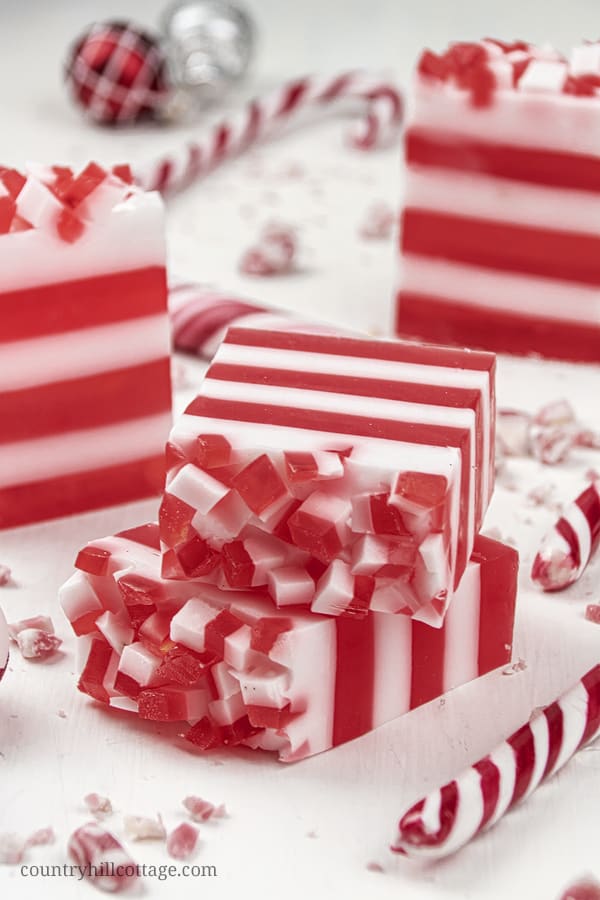
Without adding a decoration, the peppermint soap will look like this: 6 beautiful red and white layers, naturally scented with peppermint essential oil.
Candy cane soap decorations
Sometimes melt and pour soap recipes can look a bit bland. To add visual interest, I decorated the this Christmas melt and pour soap recipe with small soap pieces that look like chopped candy cane. Adding a decoration is optional. You can either do it before or while you make the candy cane soap.
Here is how you do it:
- Make the white layer. To make the Christmas soap decorations pour 0.75 oz / 25 g white soap base and pour into a silicone soap mould (I used this soap mould). Spritz with rubbing alcohol and let cool completely.
- Create the red layer. Then melt a 0.75 oz / 25 g clear soap base, add small amount red mica, and pour over the white layer. Spritz with alcohol and allow to harden
- Cut soap into cubes. Once both layers have set, remove the soap bar from the mould and cut into small cubes. Set aside until ready to use.
- Decorate the soap. Wait for 1 to 2 minutes after you have poured the last layer (white). Then top with the soap decorations and gently press into the white soap layer.
- Refrigerate until hard.
Unmould and cut peppermint soap bars
- To unmould the soap, first pull away the sides of the mould to break the airlock. Then push out the soap from the bottom.
- Using a soap cutter or sharp knife, cut the melt and pour block into 3 to 4 peppermint soap bars. Since the bars are rather large, I cut away a little on the sides, but you don’t have to do this.
Tip: Use a sharp knife with a smooth blade to cut this homemade mint soap recipe. A dull knife can lead the layers to separate.
And there you have it, beautiful homemade peppermint soap!

Can melt and pour soap be used right away?
Yes, you can use melt and pour soap right away. Unlike cold process, melt and pour soap already has undergone saponification and doesn’t need time to cure.
Soap gifts for Christmas
Because this melt and pour Christmas soap recipe is so pretty, I didn’t want to hide the soap behind wrapping paper. Instead, I wrapped in plastic wrap/clingfilm and then in cellophane. I attached one of our free printable candy cane gift tags with a pretty ribbon.
Shelf life and storage of homemade candy cane soap
Wrap each candy cane soap bar in plastic wrap/clingfilm to avoid glycerin dew and store in an airtight container. The soap can be kept for 1 year.
More soap recipes
If you like this homemade Christmas soap, you might like some of my other soap recipes:

DIY Peppermint Soap – Homemade Christmas Soap Recipe
See how to make DIY candy cane soap! This easy peppermint soap recipe is made with melt and pour soap and essential oils. The Christmas soap looks very festive and is a great homemade holiday gift idea.
Materials
Tools
Instructions
- Cut 3.5 oz / 100 g clear melt and pour soap into small cubes. The smaller the cubes are, the quicker the soap melts.
- Transfer the soap cubes into a large, microwave-safe measuring cup. Melt in the microwave set to 50% power in 30-second bursts, stirring well after each interval.
- Once the soap is completely melted, stir in 5 drops peppermint essential oil and 1/8 tsp red mica. Give the soap a good stir.
- Put the soap mould on a cutting tray so it can be moved easily. Spray the mould with alcohol.
- Pour the melted soap into the mould cavity and spritz with alcohol to dissolve bubbles.
- Carefully transfer into the refrigerator for 30 minutes or until the soap has set. You can tell that the soap is ready when the centre of the soap feels solid.
- Repeat this process with alternating layers of white and red soap base. I used 3.5 oz / 100 g of soap for every layer. If you follow the recipe, you should end up with 6 layers, 3 red and 3 white.
- To unmould the soap, first pull away the sides of the mould to break the airlock. Then push out the soap from the bottom.
- Using a soap cutter or sharp knife, cut the melt and pour block into 3 to 4 peppermint soap bars.
Candy cane soap decorations
- To make the Christmas soap decorations pour melt 0.75 oz / 25 g white soap base and pour into a silicone soap mould (I used this mould). Spritz with rubbing alcohol and let cool completely.
- Melt a 0.75 oz / 25 g clear soap base, add small amount red mica, and pour over the white layer. Spritz with alcohol and allow to harden
- Once both layers have set, remove the soap bar from the mould and cut into small cubes. Set aside until ready to use.
- Wait for 1 to 2 minutes after you have poured the last layer (white). Then top with the soap decorations and gently press into the white soap layer.
- Refrigerate until hard.
Notes
Shelf life and storage
Wrap each candy cane soap bar in plastic wrap/clingfilm to avoid glycerin dew and store in an airtight container. The soap can be kept for 1 year.
Recommended Products
As an Amazon Associate and member of other affiliate programs, I earn from qualifying purchases.


SueB
Tuesday 4th of November 2025
I made these and they were perfect-until I picked one up. Then the levels all came apart. I tried it again and same results. I had trouble with the temperature. To make the soap liquid, the temperature was way too high. That was the first attempt. The second attempt was clumpy because the temp was correct. Smelled great and made my hands soft, but with little strips! lol
Heidi | The Frugal Girls
Tuesday 10th of December 2019
These are SO gorgeous, and would make such lovely gifts!!
Irena | Country Hill Cottage
Tuesday 10th of December 2019
Thanks a lot, Heidi! So glad you like this DIY.
Rebecca Dillon
Tuesday 10th of December 2019
What a fun project for the holidays. These are perfect for stocking stuffers this Christmas!
Irena | Country Hill Cottage
Tuesday 10th of December 2019
Many thanks, Rebecca! Stocking stuffers is what I'll be using them for, too.
A Life Adjacent
Tuesday 10th of December 2019
The layers are so pretty! What a lovely touch to put in a guest room during the holidays or as the cutest stocking stuffer!
Irena | Country Hill Cottage
Tuesday 10th of December 2019
Thank you, ladies! xx