
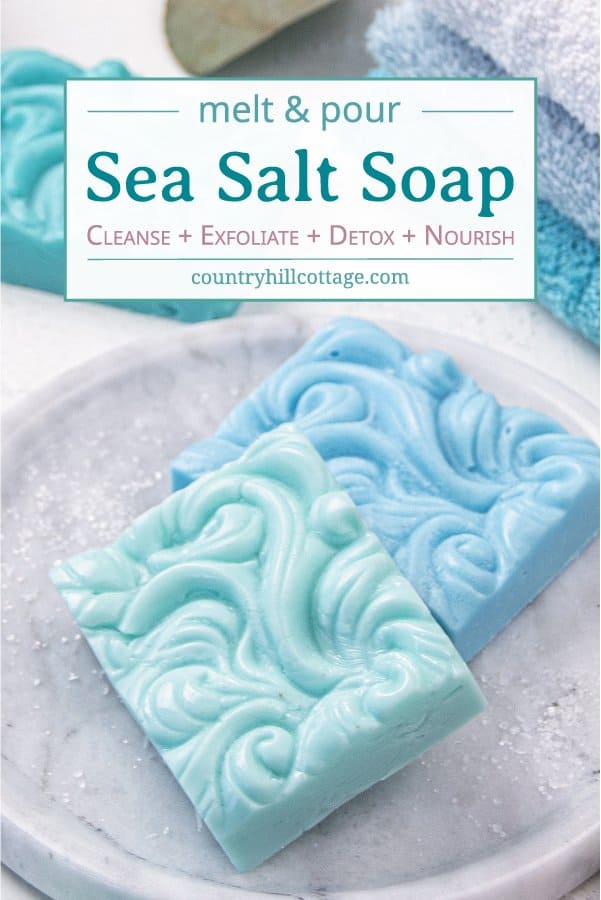
See how to make sea salt soap! This easy sea salt soap recipe is a real skincare treat. The homemade soap cleanses, exfoliates, purifies and nourishes in a single step and can be helpful to soothe acne, breakouts, and eczema. The DIY melt-pour soap tutorial is an easy soap making recipe for beginners and makes a wonderful handmade gift.
Disclosure: This post contains affiliate links, meaning, at no additional cost to you, we will earn a small commission if you click through and make a purchase. Learn more
Homemade sea salt soap recipe – DIY sea salt body soap
This homemade sea salt soap recipe is a wonderful skincare idea! It came about because some of you have been asking me if my exfoliating sugar soap scrub bars can be done with salt. So, of course, I had to try it and created this easy melt-and-pour soap recipe.
What is sea salt soap?
Sea salt soap is a bar soap enriched with fine sea salt. This gentle body cleanser combines the benefits of salt baths and natural soap. Hand-poured sea salt soaps have been a wellness trend for a while now. But unlike the expensive products in stores, my homemade sea salt soap costs only a fraction of the price.
Sea salt soap benefits for skin
Is salt soap good for your skin? Yes, salt scrub soap is very good for the skin. Sea salt is full of minerals that are beneficial to the skin like magnesium, calcium, sodium, zinc, potassium and more. In case you don’t know about the benefits of sea salt, here are some:
- tones the skin
- balances oil production
- cleanses pores deeply
- eliminates bacteria that can cause acne and breakouts
- removes toxins from the body
- calms eczema and skin rashes
What does sea salt soap do?
Think of this sea salt soap recipe as a four-in-one spa treatment that cleans, exfoliates, detoxifies and moisturises – and all that in a single step! The soap cleanses, while the salt gently polishes the skin and draws toxins out of the body. Goatmilk and shea butter nourish and hydrate your skin.
Sea salt soap for acne – Does sea salt soap help acne?
Yes, the soap is good for acne. This oily skin soap recipe can be beneficial to reduce acne on the back and other parts of the body. How long does it take for sea salt to clear acne? Hard to say since every body functions differently.
Sea salt soap for eczema – Is sea salt good for eczema?
Yes! Goat milk sea salt soap protects the skin from over-drying, helps to balance the pH level of the skin and reduces redness and inflammation. Don’t you just love so many benefits of sea salt on the skin?


Melt and pour sea salt soap recipe
Most salt bar recipes are cold process soap recipes. Cold process soap requires handling lye, which should only be done by experienced soap makers. So, I created an easy melt and pour soap recipe that even beginners can do.
This DIY melt-and-pour soap is easy but a little more advanced than my other soap tutorials. Salt in soap hardens very fast. But don’t worry, I share all my tips and tricks so you know exactly how to make sea salt soap!
If you are totally new to soap making, try a beginner melt and pour soap recipe first, for example, this moisturizing soap or my pumpkin spice soap. This way, you will get used to working with melt and pour soap.
Materials for homemade sea salt soap
Here is a list of the materials and supplies we need for this DIY soap recipe:
- soap base – DIY sea salt soap can be made with any melt and pour soap base. I prepared the recipe with goats milk and glycerin bases and liked the results.
- fine sea salt – Fine Pacific sea salt or unrefined Pink Himalayan sea salt are among the best sea salts for skin and perfect for this natural soap DIY. Dead Sea salt and Epsom salt are not suitable for this recipe.
- shea butter – Raw shea butter offers a variety of skincare benefits. The plant butter is exceptionally moisturising and contains loads of skin-healing vitamins. Shea can also help to treat acne and reduce the appearance of acne scars.
- colourant (optional) – For a little colour, dye the soap with mica (I used Black Sea). Without dye, the salt soap recipe will appear white.

Essential oils for sea salt soap
The sea salt soap recipe is naturally scented with blue cypress and lemongrass essential oils. The smell of this soap is fresh and clean, a natural soap fragrance that men will enjoy, too. Why not make this easy melt and pour soap recipe as homemade Father’s day gift idea?
- blue cypress essential oil – Blue cypress has a fresh, woodsy and balsamic scent. The oil also provides excellent support for skin health and healthy respiratory functioning.
- lemongrass essential oil – Lemongrass EO is refreshing, deodorizing and uplifting to the spirit. It can also boost circulation and soothe overused muscles and joints.
You have almost endless possibilities when it comes to essential oils for soap. So feel free to be creative and come up with your own essential oil combinations for soap making.
Tools
I used the following equipment for this soap making tutorial:
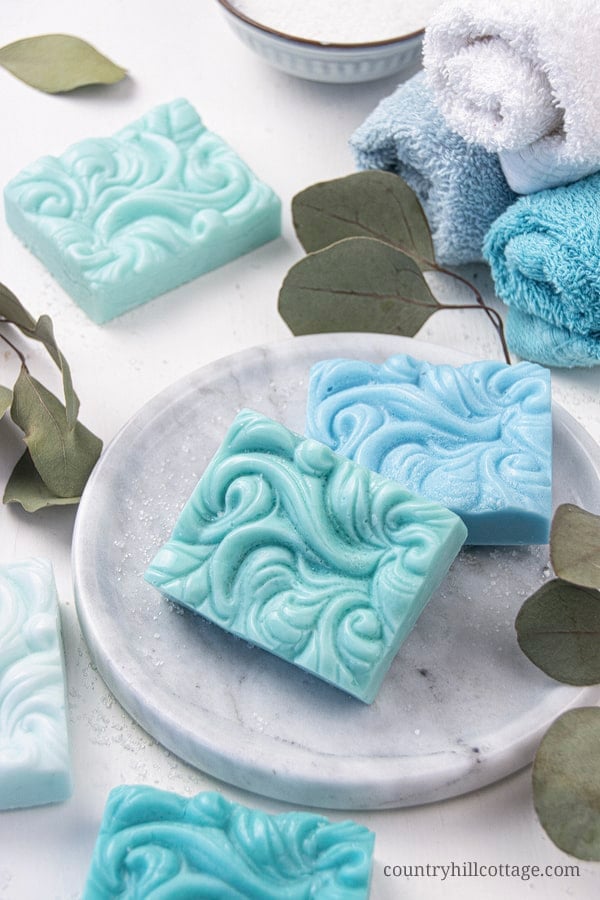
- soap mould – I used this beautiful ocean wave mould to form my sea salt soap bars. A classic rectangular silicone soap mould works well, too.
- food processor – A food processor allows to mill the salt crystals into a fine dust. Milling the salt makes it less abrasive on the skin and better mineral absorption.
- cutting board and paring knife – A knife and cutting board are required to cut the melt and pour soap base into smaller pieces before melting.
- measuring cup – A large heat-proof measuring cup or pitcher is needed to melt the soap.

How to make sea salt soap
How do you make sea salt soap? The very first thing you need to know about adding salt to melt and pour soap is that salt in soap hardens FAST. It’s important to prep properly and work quickly. I also recommend to make only one soap bar at a time.
Here is how to make salt bars:
- Before you start. Salt soap will thicken quickly. So make sure you have ALL your supplies ready before starting. Uncap the essential oils and place the soap mould on a cutting board or small cookie sheet.
- Mill the sea salt. Put the sea salt into a food processor or blender and pulse a couple of times. Extra fine salt is gentler on the skin. Beware of the dust cloud when opening the food processor and avoid breathing in salt dust.
- Cut the soap base. Cut the melt and pour soap base into small pieces, the smaller the better.
- Melt the ingredients. Add the soap cubes, salt, shea butter, and mica into a micro-wave safe pitcher or measuring cup. Melt in the microwave in 30-second increments until liquid. Do not stir while melting.
- Add essential oils. Take the liquid soap out of the microwave and add the essential oils. Give the mixture a quick stir.
- Pour the salt soap. Pour the mixture into the mould. Scrape down the sides of the measuring cup and stir in the scraps. Melt and pour salt soap will harden almost immediately, so work quickly.
- Chill the soap. Place the mould into the fridge to harden, for about 20 to 30 minutes.
- Release the soap salt bar. Once the soap bar feels cool the touch, release it from the mould.

How to use sea salt soap
Use the sea salt soap recipe like you would use any other body soap. The soap can be used in the shower or during a bath. Here is how to do it properly:
- Rinse your body with warm water.
- Start at the neck, scrub your shoulders, arms, chest, waist, down to the legs and feet.
- After cleaning the front, switch to the back of your body.
- You can rub the soap directly over your body or create a lather in your hands and then scrub.
- Massage the soap into the skin with gentle, circular motions.
- Rinse with warm water.
I don’t recommend using this recipe as a face soap.
Storage and shelf life of exfoliating salt soap
For the best shelf life, shore the sea salt soap bars in a dry and cool location, away from direct sunlight. This homemade soap with essential oils recipe can be kept for 1 year.


Sea salt bar recipe FAQ
Can I use coarse salt?
Fine-grain salt is best in this recipe. Coarse salt can be too harsh and abrasive on the skin.
May I make salt soap with dead sea salt or Epsom salt?
No, I only recommend fine grain Himalayan or Pacific sea salt for this homemade soap recipe. Dead sea salt and Epsom salt can make the soap bars soft and mushy.
Could I pour the soap into a large soap mould?
Single cavity or divider moulds work best. As mentioned previously, salt soap hardens QUICKLY. By the time a large soap bar is solid, it will be too hard to cut.

More soap recipes
For more sea salt skin care products, try this sea salt scrub. And if you like free soap tutorials like this one, here are a few more easy homemade soap recipes to try:
- eucalyptus soap
- citrus soap
- lemon lavender honey soap
- sugar soap scrub bars
- moisturizing soap for dry skin
- antibacterial hand soap
- turmeric soap
- pumpkin spice soap
- peppermint soap
- liquid hand soap
- DIY exfoliating soap
- homemade cold process soap recipe

Sea Salt Soap Recipe
See how to make sea salt soap! This easy sea salt soap recipe is a real skincare treat. The homemade soap cleanses, exfoliates, purifies and nourishes in a single step and can be helpful to soothe acne, breakouts, and eczema. The DIY melt-pour soap tutorial is an easy soap making recipe for beginners and makes a wonderful handmade gift.
Materials
Tools
Instructions
- Salt soap will thicken quickly. Make sure to have all your supplies ready before starting. Uncap the essential oils and place the soap mould on a cutting board or small cookie sheet.
- Put the sea salt into a food processor or blender and pulse a couple of times. Beware of the dust cloud when opening the food processor and avoid breathing in salt dust. This step is optional but recommended because extra fine salt is gentler on the skin.
- Cut the melt and pour soap base into small pieces, the smaller the better.
- Add the soap cubes, salt, shea butter and mica into a micro-wave safe pitcher or measuring cup. Melt in the microwave in 30-second increments until liquid. Do not stir while melting.
- Take the liquid soap out of the microwave and add the essential oils. Give the mixture a quick stir.
- Pour the mixture into the mould. Scrape down the sides of the measuring cup and stir in the scraps. Melt and pour salt soap will harden almost immediately, so work quickly.
- Place the mould into the fridge to harden, for about 20 to 30 minutes.
- Once the soap bar feels cool the touch, release it from the mould.
Notes
How to use sea salt soap
Use the sea salt soap recipe like you would use any other body soap. The soap can be used in the shower or during a bath. Here is how to do it properly:
- Rinse your body with warm water.
- Start at the neck, scrub your shoulders, arms, chest, waist, down to the legs and feet.
- After cleaning the front, switch to the back of your body.
- You can rub the soap directly over your body or create a lather in your hands and then scrub.
- Massage the soap into the skin with gentle, circular motions.
- Rinse with warm water.
I don’t recommend using this recipe as a face soap.
Storage and shelf life of exfoliating sea salt soap
For the best shelf life, shore the sea salt soap bars in a dry and cool location, away from direct sunlight. This homemade soap with essential oils recipe can be kept for 1 year.
Recommended Products
As an Amazon Associate and member of other affiliate programs, we earn from qualifying purchases.


Over to you!
Thanks so much for visiting Country Hill Cottage – we’re so happy you’re here! Have some feedback you’d like to share? Leave a note in the comment section below!
If you enjoyed this post, please share it using the social media buttons you see next to the post.
For more crafts, beauty DIYs and recipe, follow us on Pinterest, Instagram, and Facebook.
Irena xx


Marissa
Saturday 29th of November 2025
Great recipe thanks for sharing. Is there a way to stop the salt dropping to the bottom. All the salt is at the bottom of the mould.
Amanda
Wednesday 13th of April 2022
This looks awesome! Do you add 90g of goat milk melt and 90g of soap base? Or just use one the them. Or do 30g of each. The recipe says “90 g goat milk melt and pour soap base” and wasn’t sure.
Amanda
Wednesday 11th of May 2022
Thanks!!!
Irena | Country Hill Cottage
Monday 18th of April 2022
Hi Amanda! Sorry for the confusion. "Goat Milk Melt and Pour Soap Base" is one word/one product, it's not 2 different items.
The this type of soap base is called "melt and pour soap" or "M&P soap." Different types of melt and pour soap are available such as honey melt and pour soap, glycerin melt and pour soap, or goat milk and pour soap.
For one soap, you'll need 90 g goat milk melt and pour soap.
I hope this helps and please don't hesitate to ask if you have more questions!
Bethany
Friday 3rd of September 2021
Thank you for sharing! I did this but used vanilla and peppermint oils and no added color. It came out beautifully pale pink and feels so good on my skin!
Irena | Country Hill Cottage
Friday 3rd of September 2021
Thank you so much for sharing your feedback, Bethany! Your adjustments sound absolutely lovely and I'm pleased to hear that the soap feels good.
Valerie
Sunday 29th of November 2020
Can you make this recipe printable and more user friendly. The ads are too much and really distract from the content so much so that I can really see how to do a printed version.
Irena | Country Hill Cottage
Sunday 29th of November 2020
Hi Valerie. There is a button to print the recipe in the How To box at the end of the post. You can also print it here.
I'm sorry that you find the ads distracting. Blogging is what we do for a living. The way we earn income for our site includes ads. They help us feed our families, and cover the many expenses of running a blog. Ads are one of the reasons why we are able to keep offering free content to our readers.
We have considered creating a membership site where readers can pay a small monthly fee and enjoy our content ad-free. Please let me know if this is something that you would like to see in the future.
Enjoy the soap recipe and please let me know in case you have another question!
Cindy
Sunday 1st of November 2020
Do I have to use sea salts at all? Can I use this recipe but no salts?
Irena | Country Hill Cottage
Monday 2nd of November 2020
Hi Cindy. Yes, you can make the soap without any salts.