


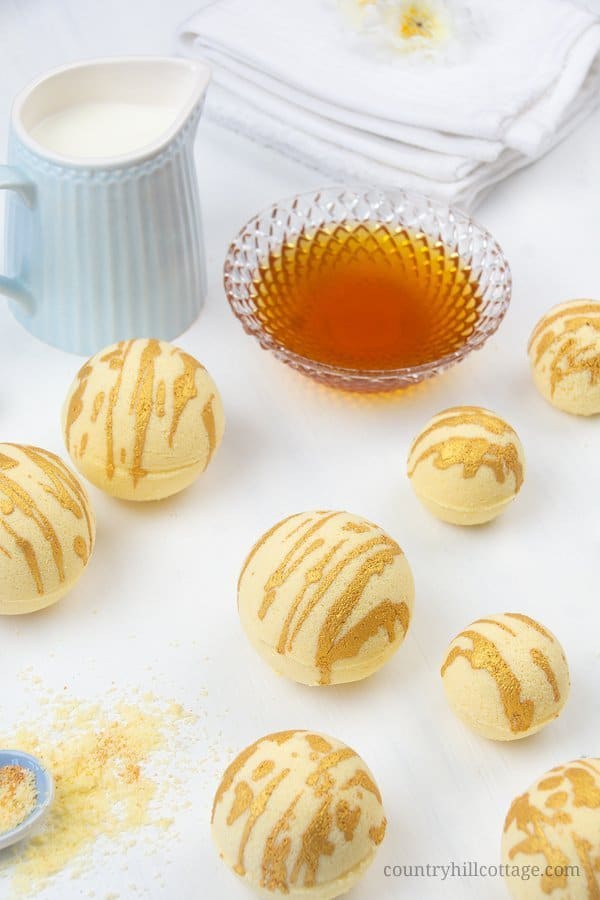
Enjoy a hydrating and relaxing bath with these DIY moisturising bath bombs! The easy bath bomb recipe, made with cocoa butter, milk powder, and honey powder, will leave your skin supple and soft.

DIY moisturising bath bombs
When you think about What can I put in my bath to soften my skin? or How can I make my bath more moistursing? bath bombs may not be your first thought. Sure, bath bombs smell amazing, and it’s fun to watch them fizz away in the tub. But do bath bombs moisturise? Well, they can be hydrating and suitable for dry skin – with the right ingredients.
Moisturising milk and honey bath bombs
These homemade hydrating bath bombs are a great addition to make your bath more moisturising. They get their hydrating and skin nourishing qualities from the addition of cocoa butter, powdered milk, and honey powder.
Cocoa butter hydrates even very dry and sensitive skin, providing long-lasting moisturization. The milk fat and proteins make your skin feel soft and nourished. Furthermore, the lactic acid gently exfoliates the skin while you soak. The nutrients and healing compounds within honey powder amplify these effects and helps to keep your skin the healthiest it can be.


What are the benefits of a milk and honey bath?
The ingredients in these DIY moisturising bath bombs turn the water into a silky and luxurious honey milk bath. Milk baths have been used for ages to improve skin health and improve the beauty of the skin. Personally, I think they are an excellent addition to your natural beauty routine.
Possible benefits of a honey milk bath can include:
- Milk and honey help to replenish lost moisture in the skin and soothe dry, itchy skin.
- As mentioned before, the lactic acid in milk and the enzymes in honey have cleansing properties, gently exfoliate the skin, and clean dead skin cells.
- A milk and honey bath can also help to soothe and relieve skin irritations. The antibacterial and anti-inflammatory properties of honey are beneficial to heal and nourish the skin.
- Both ingredients are also said to have an antiaging effect, helping to reduce fine lines and cellulite dimples.
- Taking a bath also is a wonderful spa experience and enhances relaxation. I simply love to destress and untangle in the tub and enjoy the calming, rejuvenating effect a bath can have.
And if you love milk and honey as much as we do, try Cyna’s milk and honey body wash, too.
More DYI bath products for dry skin
To moisturise your skin while you bath, also try my rose bath truffles, floral bath creamers, or this relaxing bath oil.

What ingredients do I need to make easy DIY moisturising bath bombs at home?
Like most bath bomb recipes, the materials to make these DIY moisturizing bath bombs include baking soda (sodium bicarbonate) and citric acid. I have talked about these two ingredients in other recipes, and you can learn more here.
Now let’s talk about what ingredients you can put in bath bombs to soften your skin.
Cocoa butter
Cocoa butter makes the bath water feel silky smooth and luxurious. The butter contains many natural vitamins and fatty acids that provide nourishment and moisture the skin. Cocoa butter is rich in antioxidants and an excellent emollient, meaning it helps the skin absorb moisture.
Shea butter is a great alternative in case you prefer to make DIY bath bombs with shea butter. The steps are the same, but you may have to adjust the amount of shea butter to get the right consistency.
One thing to note is that bath bombs with oils in them don’t dry has rock hard as bath bombs made solely with alcohol or witch hazel. Bath bombs with shea butter or cocoa butter also tend to be slightly less fizzy than oil-free bath bombs.
I found that these milk and honey bath bombs still fizz away nicely and I love the skin-hydrating properties of cocoa butter.
For those interested in oil-free moisturising bath bombs that have a great fizz, check out these strawberry milkshake bath bombs I shared over on Everything Pretty.
Milk powder
For this recipe, I used goat milk powder, which is packed with nutrients such as lactic acid, minerals calcium, magnesium, and potassium, as well as vitamins A and D. It helps to moisturise the skin and hair. Water reconstitutes the milk powder, giving the bath water a lush and silky texture.
This powder also contains linoleic acid, which supports the skin structure, and other essential fatty acids that are very moisturising and help to even out the skin tone. And if you are wondering, no, it doesn’t smell like goat at all.
You can also use whole milk powder or coconut milk powder instead.
Honey powder
Honey powder has many skin care benefits. It’s naturally antiseptic, antimicrobial, and has anti-inflammatory properties that can help to soothe irritated, inflamed skin and can beneficial to fight and reduce acne.
As a natural humectant, honey traps moisture and will help to moisturize and strengthen the skin. Its many essential minerals (calcium, iron, zinc, phosphorus, selenium, and magnesium), vitamins B and C and enzymes nourish the skin, exfoliate gently and control your skin’s oil production.
Mica powder
Many bath bomb recipes suggest using food colour to tint bath bombs because food colours are widely available and safe to use.
But have you ever used food colour in your bath bombs and noticed that there was no colour in the bath water? While food colour can tint bath bombs nicely, they aren’t really intended to be used in cosmetic products, and their pigments are not strong enough to colour a tub full of water. That being said, you can still use them.
Mica powders, on the other hand, are potent cosmetic pigments and will release colour nicely into the bath water. Micas are ideal for bath bombs because they are dry powders instead of liquids and won’t change the consistency of the bath bomb mixture. Since the colouring effect is so strong, it’s best to start out with small amounts and gradually add more.
When you mix the mica powder with the dry ingredients, the colour will appear lighter than in the finished bath bombs. Once you add the liquid ingredients (cocoa butter in this recipe), you’ll notice how the shade deepens, and the colour looks richer.
Mica powders come in countless colours, and I love this set of 21 mica powders.
Polysorbate 80
Polysorbate 80 is a water-soluble emulsifier that helps to disperse the oils and mica with the bath water instead of just pooling on top. While it isn’t absolutely necessary, I highly recommend adding this ingredient to your bath bomb mixture.
And if you worry about bath bombs staining the tub, Polysorbate 80 is a must as it prevents stains and transfers to the tub.


A bath bomb recipe without cornstarch
Looking at the ingredient list, you’ll notice that this DIY moisturising bath bombs recipe is prepared without cornstarch (cornflour). If you have wondered about a substitute or replacement for cornstarch in bath bombs, the answer is you don’t need one.
Cornstarch is mostly used a filler in bath bombs to control the fizziness. Skipping it will only result in bath bombs that dissolve faster than bath bombs that have cornstarch as an ingredient.
Fragrance and essential oils for bath bombs
Without any additional fragrance, the bath bombs will have a faint cocoa and milk scent that I actually liked a lot. The honey powder barely smells at all so you can add a honey fragrance oil to make it more pronounced.
DIY essential oil blend ideas for homemade bath bombs
It’s also possible to fragrance these homemade bath bombs naturally with essential oils. Here are a few essential oil blend ideas for these DIY moisturising bath bombs that are wonderful to relax in the tub:
- My favourite fragrance combo for these bath bombs is a 2:1 blend of vanilla oleoresin and cardamom, which will boost your mood and also provides antioxidants to nourish the skin.
- For an energising and uplifting effect, create a blend of grapefruit, bergamot, and cardamom. (2:2:1)
- A fresh and citrusy blend that also promotes circulation can be mixed with blood orange, lemongrass, and ginger. (2:2:1)
- Sore muscles can be relieved with a mix of rosemary, turmeric, eucalyptus, and sweet marjoram. (2:1:1:1)
I recommend to skip essential oils for pregnant women or small children under the age of 6.

A word about honey absolute
You might be wondering why I didn’t say anything about honey essential oil. For one, honey essential doesn’t exist. So please don’t purchase anything that claims to be honey essential oil as you can’t be certain what you actually get.
You occasionally may find a honey absolute, which usually is a blend of honey absolute and a carrier oil, on perfumery websites. It’s often very pricey, and I haven’t tried it yet so I can’t comment much on it.
Tips for making bath bombs in silicone moulds
The instructions below explain how you can create bath bombs with round moulds like you see on the photos. Forming round bath bombs takes a bit of practice and usually works best on days with low humidity. Soft silicone moulds are a great alternative to round bath bombs and make it easier to form bath bombs.
To make the bath bombs with a silicone mould, prepare the bath bomb mixture as described in the recipe. Then press and pack the mixture tightly into the mould and let dry for at least 24 hours. After that, gently pop out the bath bombs.
Imagine how cute these milk and honey bath bombs would look in this pretty bee and honeycomb mould.

How to paint on bath bombs with mica
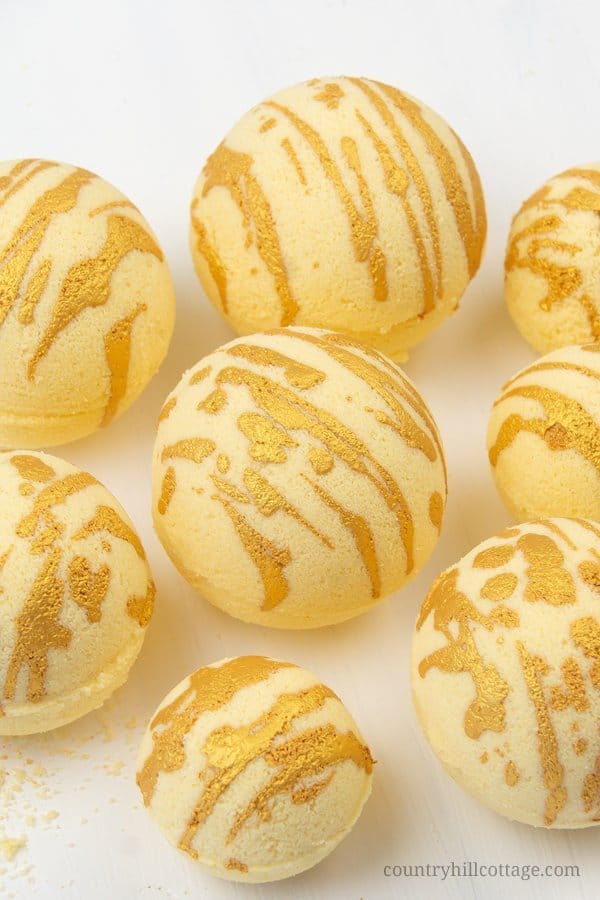
The honey and milk powder have a pale yellow colour, and the bath bombs will simply look off white if you don’t add any colour. I decided to jazz up my milk and honey both bombs and mixed dark yellow mica powder into the mixture to give the bath bombs a soft honey look.
For a little extra sparkle, I created a thick mica paint by mixing gold mica powder with pure alcohol. Then I used a dropper to create a splatter pattern on the bath bombs.
The mica paint technique is very easy and can be used in endless ways to decorate bath bombs, soaps, and other body products.
Tips for the mica paint technique
Here are a few tips to get the best results when painting bath bombs with mica:
- Use 99% isopropyl alcohol. This alcohol is almost pure alcohol without any water and evaporates quickly. If you use alcohol with a lower percentage (e.g. rubbing alcohol), the extra water can cause a reaction with the bath bombs.
- The bath bombs need to be completely dry before you apply the mica paint. It’s best to wait for at least 24 hours before you paint on the bath bombs. Because cocoa butter takes up to 48 hours before fully hard, I waited for 2 days and put my bath bombs in the fridge for one hour before applying the paint.
- A dropper can be used to drizzle paint on the bath bombs for a paint splatter effect. A soft brush can be used to create broad brush strokes or paint on small details.
- If you notice that the mica paint starts clumping, mix in a bit more alcohol and combine well.
- Because I add the Polysorbate 80, the bath bomb didn’t leave a ring of colour on my tub. This may vary depending on the colour and amount of mica you use.
- I let my leftover paint dry. After the alcohol has complete evaporated, you will be left with mica powder that you can reuse.
Have you ever painted with mica? Let me know about your experiences in the comment section below!


DIY Moisturising Bath Bombs Recipe with Cocoa Butter
Enjoy a hydrating and relaxing bath with these DIY moisturising bath bombs! The easy bath bomb recipe, made with cocoa butter, milk powder, and honey powder, will leave your skin supple and soft.
Materials
Milk and honey bath bombs
- 2 cups / 260 g / 9.2 oz baking soda (sodium bicarbonate)
- 1 1/4 cups / 125 g / 4.4 oz citric acid
- 65 g – 85 g / 2.3 oz – 3 oz cocoa butter
- 65 g / 2.3 oz milk powder
- 25 g / 0.9 oz honey powder
- up to 10 g / 0.4 oz fragrance or essential oil(s)
- 1 – 2 tsp yellow mica
- 1 tsp / 7 g / 0.25 oz Polysorbate 80
Mica Paint
Tools
Instructions
Make the bath bombs
- Melt the cocoa butter either in a double boiler or in the microwave set to medium in 1-minute intervals.
- Allow the melted cocoa butter to cool for 10 minutes before adding the polysorbate and fragrance or essential oil(s).
- Next, sift the baking soda and citric acid into a bowl.
- Add the milk powder, honey powder, and mica if using any. Whisk to combine well.
- Now knead the liquid ingredients into the dry ones until the mixture has the consistency of damp sand and keep its shape when pressed together it in your hands.
- Loosely fill both halves of a bath bomb mould with the mixture, creating a high heap in the middle.
- Press firmly together and wipe away any excess.
- Carefully unmould the bath bomb and place on a baking tray (sheet) lined with bubble wrap and allow to dry for 24 hours.
Paint the bath bombs
- Cover the work surface with parchment / baking paper and place the bath bombs closely next to each other.
- In a small mixing bowl, mix together 1 teaspoon gold mica with 1 tablespoon isopropyl alcohol.
- Using a dropper, drizzle the mica paint across the bath bombs. It’s best to do a test on one bath bomb first to see if the bath bombs have dried enough to be painted.
Notes
•To avoid a reaction, add only 1 teaspoon of liquid at a time and immediately combine with the dry ingredients.
•Depending on the humidity in your area, the amount of cocoa butter will vary. I made the bath bombs on a hot summer day and need all of the cocoa butter.
•High or very low humidity can make it more challenging to shape bath bombs. If you notice that your mixture dries out while forming bath bombs, rehydrate the mix with a few spritzes alcohol or witch hazel.
Recommended Products
As an Amazon Associate and member of other affiliate programs, we earn from qualifying purchases.


How to use the DIY moisturising bath bombs
Add one or two bath bombs in the bottom of your shower or in your warm bathtub to create fizz and bubbles and to release the fragrance.
Storage and shelf life
Stored in a dry and dark place, the bath bombs have a shelf life of up to 2 months (goat milk powder) or 9 months (coconut milk powder).

Over to you!
Thanks so much for visiting Country Hill Cottage – we’re so happy you’re here! Have some feedback you’d like to share? Leave a note in the comment section below!
If you enjoyed this post, please share it using the social media buttons you see below the post.
For more crafts, beauty DIYs and recipe, follow us on Pinterest, Instagram, and Facebook.
Irena xx


Jennifer
Friday 5th of January 2024
I noticed in your tutorial video you used emulsifier. I didn't see this in you ingredient list. Do we need this? If so how much? What's the use for this?
Thank you so much
Irena | Country Hill Cottage
Saturday 6th of January 2024
Hi Jessica! Polysorbate 80 is the emulsifier. It's listed in the ingredient list and you need 1 teaspoon. I recommend to ensure the cocoa butter and mica powder wash off more easily after the bath. I hope this answers your questions and happy making!
nicole
Friday 25th of August 2023
Could I switch ot he cocoa butter with shea butter?
Irena | Country Hill Cottage
Saturday 26th of August 2023
Hi Nicole! Yes, you can substitute cocoa butter with shea butter. Happy making!
Rosie
Wednesday 28th of December 2022
I've now made these 3 times. Twice with honey fragrance and once with apple pie spice fragrance and a little red mica for color. My husband loved them, the honey fragrance is amazing and these bombs made his skin feel nice and soft to. This is my favorite bath bomb recipe. I made my daughter and daughter-in-laws bath gift baskets for Christmas. Who doesn't love getting homemade gift items. Thank you!!
Irena | Country Hill Cottage
Thursday 29th of December 2022
Thank you for this kind review, Rosie! Apple pie spice fragrance sounds absolutely delightful!
Debbie
Sunday 4th of December 2022
If I wanted to add colloidal oatmeal, would I just up the amount of Poly 80?
Irena | Country Hill Cottage
Sunday 4th of December 2022
Hi Debbie! No, you don't have to increase the amount of Poly 80 if you add colloidal oatmeal. Colloidal oatmeal will dissolve in water perfectly on its won. Happy making!
Olivia
Thursday 17th of June 2021
Me encantaron, ahora tengo todos los ingredientes para elborarlas. Muchas gracias por compartir.
Irena | Country Hill Cottage
Friday 18th of June 2021
¡Gracias, Olivia! Espero que disfruten de este tutorial.