In this paper craft tutorial, we show how to make giant red and gold paper flowers!


Giant paper flower
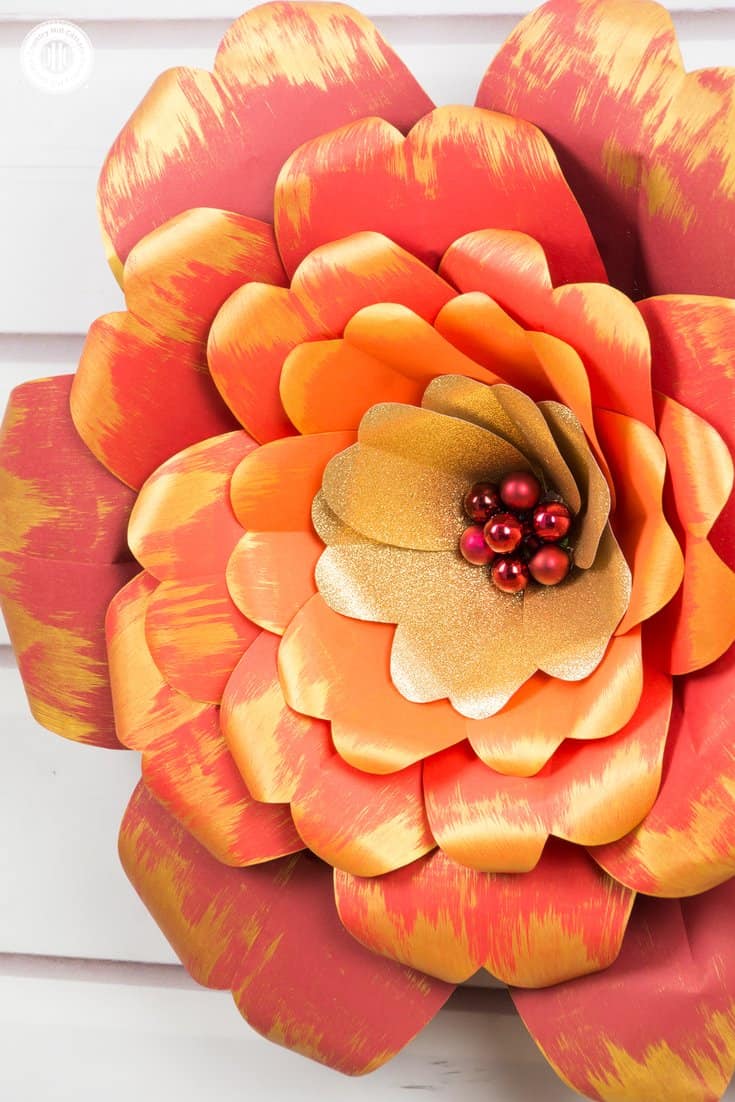
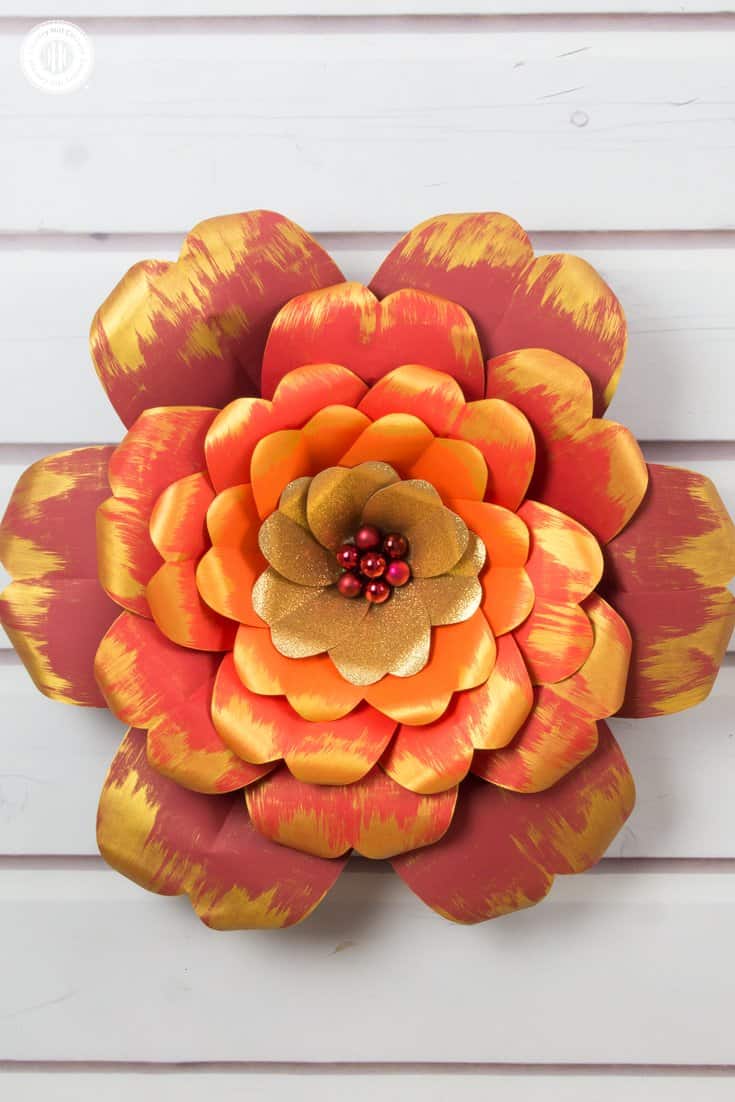
I worked with vibrant shades of cardstock for the petals, ranging from dark red to deep orange, as well as gold glitter paper, and embellished the edges of the petals with gold accents. With Christmas approaching, we used mini bauble ornaments to create the flower center and to give the flower an elegant finish.
You can make this paper flower your own by choosing another color scheme and opting for silver- or bronze-colored detailing. You can download the templates for the petals and flower base at the end of the post.
And for more crafty projects, check out our giant paper dahlia, rose, and two-toned flower tutorials!
More paper craft projects
If you’re feeling crafty, please also check out these creative projects:
- DIY Tissue Paper Pom-Poms
- How to make a Gift Bag
- Giant Paper Dahlias
- Honeycomb Pom-Poms
- Swarm of Bats Wall Decoration
- Giant Paper Roses
- DIY Tassel Garland
- Paper Rosettes
- Tissue Paper Butterflies
- Easy Crepe Paper Flowers
- Crepe Paper Roses
- Giant Tissue Paper Flowers
- Autumn Paper Leaf Wreath
- Ruffle Pom Poms
- Two-Toned Paper Flowers


Red and Gold Paper Flowers
In this paper craft tutorial, we show how to make giant red and gold paper flowers! We worked with vibrant shades of cardstock for the petals, ranging from dark red to deep orange, as well as gold glitter paper, and embellished the edges of the petals with gold accents.
Materials
- dark red, red, light red, and dark orange 130 g / 80-90 lb card stock
- gold glitter paper
- petal and base templates (download at the end of this post)
- a piece of cardboard
- gold acrylic paint
- 6 – 7 wired mini bauble ornaments in red or gold
- a piece of ribbon (optional)
- glue sticks
Tools
- pencil
- craft scissors
- sponge brush
- hot glue gun
Instructions
- Create the base. To make the base, glue the template on a piece of cardboard and cut out. The hexagon shape helps to space out the petals evenly.
Tip: If you want to hang the flower, make a small slit near the top of the circle and insert a piece of ribbon. - Use the template. Print out the petal template and cut out the five petal sizes. Trace each template with a pencil and cut out the petals. For one flower, you need: 6 dark red “XL” petals, 6 red “L” petals, 6 light red “M” petals, 6 dark orange “S” petals, and six gold “XS” petals.
- Paint the edges of the petals. Apply a small amount of gold acrylic colour onto a piece of cardboard and pick up a small amount of colour with a sponge brush. Then going from the edges inward, apply a thin layer of gold to the petals. Use the paint only lightly, so the paper doesn’t crinkle and allow to dry completely before proceeding with the next step.
- Shape the petals. Fold each petal lengthwise in half and cut a small slit into the middle at the bottom. Using hot glue, create an overlap. Handle the glue carefully as it can be quite hot. Curl back the top edges using a pencil and roll each petal two-thirds up to make the paper more bendable.
- Build the center. To make the center, gather six to seven wired mini bauble ornaments and twist the wires into a tight bundle. Shorten to 5 centimeters or two inches.
- Assemble the flower. To assemble the red and gold paper flowers, add a dot of hot glue to the bottom of the “XL” petals, and stick them around the hexagon. Allow the petals to overlap slightly. Add the next row of petals, the “L” petals, in-between the first. Continue this process with the “M”, “S”, and “XS” petals. Add a generous amount of hot glue into the center of the flower and adhere the bauble ornaments.
Tip: To remove any glue strings blow over the flower with a hair dryer until the strings disappear.
Free Printable Petal Templates
Click on the button to download your free printable petal and base templates to craft the red and gold paper flowers!


